SMS

Accessing 3DEP Data for SMS

The Surface-water Modeling System (SMS)[2] continues to expand the types of data it can use for your water modeling projects. For models in the United States, there is a very comprehensive set of elevation data that you can use in your modeling–3DEP data.

3DEP data is an amalgamation of high-resolution 3D elevation and 3D hydrography data from multiple sources. It is also "bare earth," meaning the images are ground-level only. No buildings, trees, shrubs, or ground cover of any sort have been included. Seeing the most precise shape of the ground can be very important to surface modeling. The high quality lidar data in the 3DEP project covers the vast majority of the United States and several of its territories. Coverage is becoming more comprehensive over time. We have added 3DEP as one of our options when you import map elevation information from the web.

When creating a surface-water model, you are looking for the USGS 3DEP Bare Earth DEM (North America) option from the web.

Example of the 3DEP data

To access 3DEP data in SMS, do the following:

  1. Click File | Import from Web… to open the Virtual Earth Map Location.
  2. Make your location selection here (United States and some territories only)
  3. You may have to set your Display Projection settings
  4. When you reach the Data Service Options dialog box, scroll right until you see an option for USGS 3DEP Bare Earth DEM (North America).
  5. You then save your image to the appropriate location on your computer, after you set or accept the default raster cell size.

Once you have saved your image, it will show up in the Project Explorer window under GIS Data. When saving, it will add the " _elevs.tif" extension to the name you chose. The elevation data can then be applied to your model in the usual way.

Head on over to SMS and see how 3DEP data can help your surface-water modeling.

Blog tags: 

Making Use of Recent Files in SMS

Jumping between multiple projects can be commonplace in most organizations. For this reason, the Surface-water Modeling System (SMS) includes a way to see your most recent projects. This feature makes it easier to jump between projects.

When starting SMS, you can see your recent projects by going to the File menu. Towards the bottom of the File menu, you will see the five most recent projects. Selecting any of these projects will load them into SMS.

Only the five most recent projects are listed in the File menu, but SMS provides a way to access more of your recent projects. Clicking the More… command under the recent files in the File menu will bring up the Recent Files dialog. The Recent Files dialog contains a list of recent projects. This list will go back to when the major version of the software was installed.

Example of the Recent Files dialog

The Recent Files dialog allows you to search for past projects using the Search field at the top of the dialog. This can be immensely helpful when trying to find a project that has been neglected for a while.

Also helpful is a feature that lets you open the location of the project files. You can right-click on any project and select the Open Containing Folder command to bring up the folder containing the project files in the File Explorer window. This can help you locate files you haven’t been working with in a while and may have forgotten the location.

There are some caveats to this feature. If the project files have been moved, the project will still appear in the list of recent files but SMS will not be capable of importing the file because it is being directed to the wrong location. This is also true if a folder in the directory is renamed.

The Recent Files dialog provides a great tool to help you manage your projects in SMS. Head over to SMS and see what projects you have been working on recently!

Blog tags: 

Taking Advantage of the SRH-2D Channel Calculator

The Surface-water Modeling System (SMS) provides a useful tool that generates an estimated water surface elevation on an "Exit-H" boundary condition in an SRH-2D model. The Channel Calculator in SMS makes it easier to calculate water surface elevation values. It also gives you greater control of over the parameters

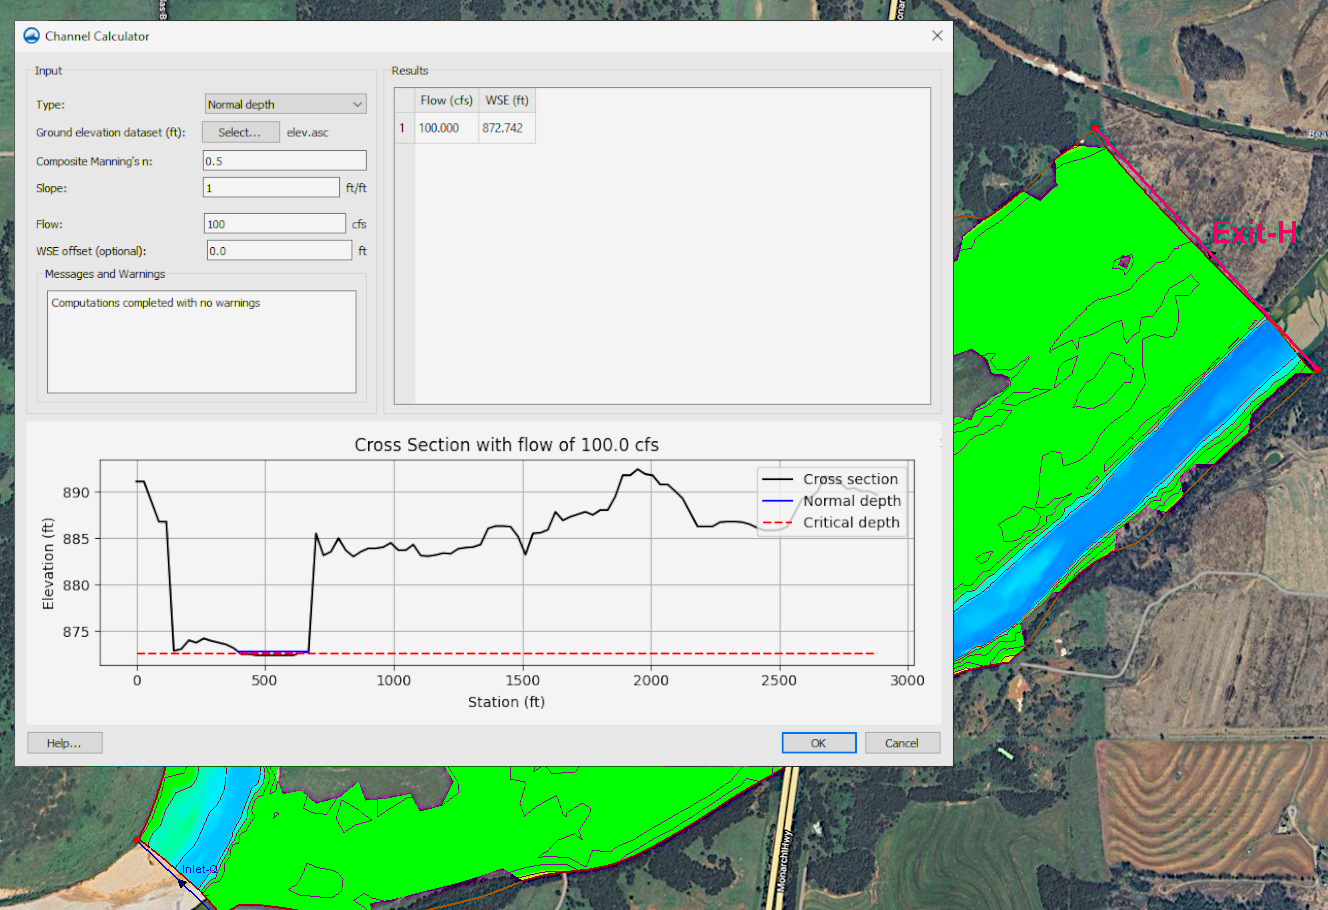
When building an SRH-2D model, the exit boundary will need to be defined. A constant elevation is often used, but this can not be sufficient in many cases. The Exit-H boundary condition is a stage type exit boundary where water surface elevation may be given as a constant number or as a stage-discharge or rating curve. The Channel Calculator is used to compute and assign a normal or critical water surface elevation for the outflow boundary condition. It also gives you greater control over the parameters used to determine the outflow conditions.

Example of the Channel Calculator in SMS

The Channel Calculator is accessed through the SRH2D Assign BC dialog. The Populate using Channel Calculator button appears at the bottom of the dialog when "Exit-H (subcritical outflow)" is selected as the BC Type and the Water Surface Elevation option has been determined.

The Channel Calculator specifies a composite roughness value, slope, and flow. SMS extracts a ground elevation cross section from a specified underlying elevation data source (mesh) that is used to compute the area and wetted perimeter. The calculator can make use of different types of elevation data sources which include DEMs, meshes, and scatter sets. Roughness and slope values will be required for the final calculation. Other options, such as the WSE offset, are optional and should only be used when necessary for your project.

The Channel Calculator will display a preview of the exit area cross section with normal and critical depth. When the Channel Calculator will save the values entered when exited. The values in the calculator can be changed later if needed.

The Channel Calculator in SMS gives you a useful tool for determining exit water-surface values for your SRH-2D projects. Try using it in SMS today!

Blog tags: 

Moving Data to Other Geometries

After you have created a model in the Surface-water Modeling System (SMS), it is not uncommon to need to move your vector data or solution datasets from one geometry to another. It could be that your model ran using a 2D mesh and now you want to move the vector data to an unstructured grid for use in another simulation. SMS gives you the ability to accurately move vector data from one geometry to another which can significantly enhance the precision of your modeling efforts.

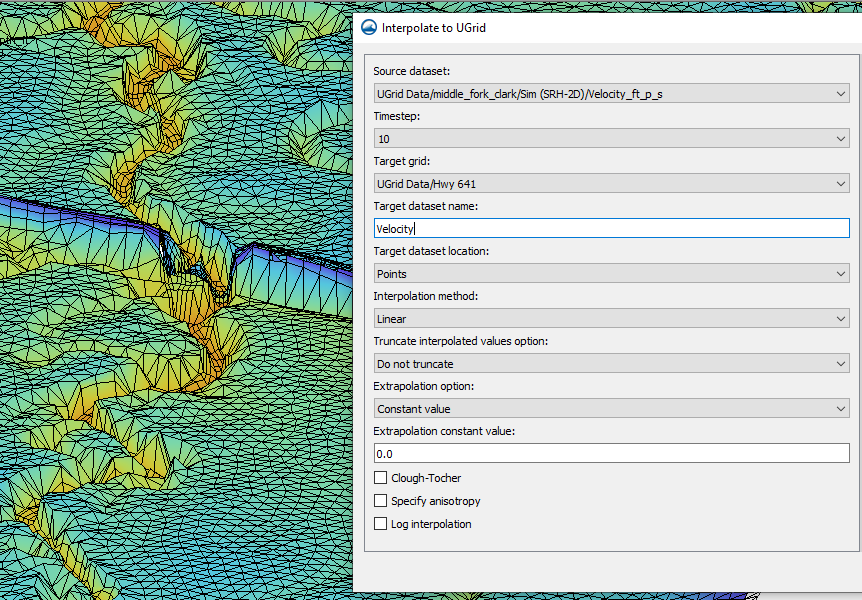
The Interpolate to UGrid tool is a powerful feature designed to streamline this process of moving datasets from one geometry to another. The Interpolate to UGrid tool is located in the Toolbox with the suite of dataset tools.

Example of the Interpolate to UGrid Tool in SMS

The Interpolate to UGrid tool facilitates the interpolation of a dataset associated with one geometry to another within the same project. While it primarily is meant to work with unstructured grids (UGrids), it can be used with other geometries such as 2D meshes or Cartesian grids. The tool will accept any dataset on the geometry, including vector and elevation sets.

The tool will follow an interpolation process to assign values on nodes or cells from one geometry to the next. Because of this, it is important to review the dataset after it has been moved, to verify that it transferred as expected.

The Interpolate to UGrid tool gives you several features that let you control the process of moving data from one geometry to another. These include:

  • Versatile Interpolation Methods: Choose the interpolation method that best suits your data and modeling objectives to achieve optimal results.
  • Customizable Interpolation Dimension: Tailor the interpolation process to match the dimensions of your target grid, whether it's 2D or 3D.
  • Truncation Options: Control the range of interpolated values with flexible truncation options. Whether you want to preserve the original data range or define custom minimum and maximum values, this tool provides the flexibility you need to fine-tune your results.
  • Extrapolation Capabilities: Handle extrapolation scenarios with ease, choosing from various extrapolation options to extend your dataset beyond the convex hull of the scatter point set.

Whether you're working with unstructured grids, 2D meshes, or other geometric entities, this tool provides the functionality and flexibility you need to enhance the accuracy of your modeling efforts. Make use of the Interpolate to UGrid tool in your SMS projects today!

Blog tags: 

Pages