Aquaveo & Water Resources Engineering News

Scalar/Vector Conversion in SMS

Datasets in SMS can be rendered as either scalar or vector data. Furthermore, SMS allows you to convert datasets between scalar and vector using either a right-click menu command or the Dataset Toolbox.

In the Project Explorer, the icon next to the dataset will show if it is a scalar or a vector dataset. In SMS, scalar datasets typically represent water surface elevation, depth, and magnitude. Vector datasets typically represent flow velocities and observed wind fields in the area.

When converting a scalar dataset to a vector dataset, two scalar datasets are needed. The scalar datasets need to be either magnitude and direction data, or x and y components. When converting vector data to scalar data, the result will be one or more datasets.

Converting Datasets with the Right-Click Menu

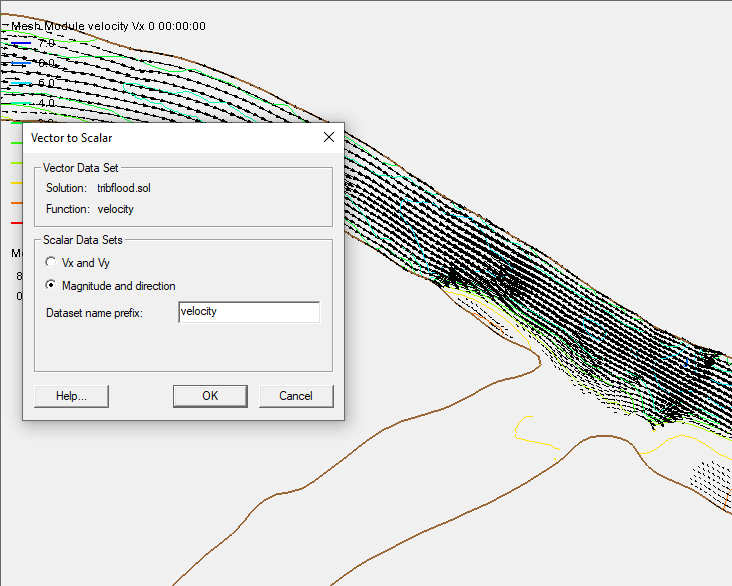
To convert a vector dataset to a scalar dataset, do the following:

  1. Right-click on the desired vector dataset in the Project Explorer.
  2. Select Vector to Scalars.
  3. After the dialog appears, options are available for the specification of either magnitude and direction or x and y components for the resulting scalar datasets.
Vector to scalar using the right-click menu

To convert scalar dataset to a vector dataset, do the following:

  1. Select two scalar datasets: either magnitude and direction or x and y components.
  2. Right-click and select Scalars to Vectors.
  3. In the dialog that appears, confirm that the components have been assigned correctly.

Note that if only one scalar dataset is selected, another dialog will appear asking you to select the second scalar dataset.

Converting Datasets with the Dataset Toolbox

The Dataset Toolbox can also be used to convert scalar datasets into vector datasets or vector datasets to scalar datasets. To do this:

  1. Click on the dataset in the Project Explorer to make it active.
  2. Select Data | Dataset Toolbox... This will bring up the Dataset Toolbox where options will be made available that are relative to the altering of the dataset.
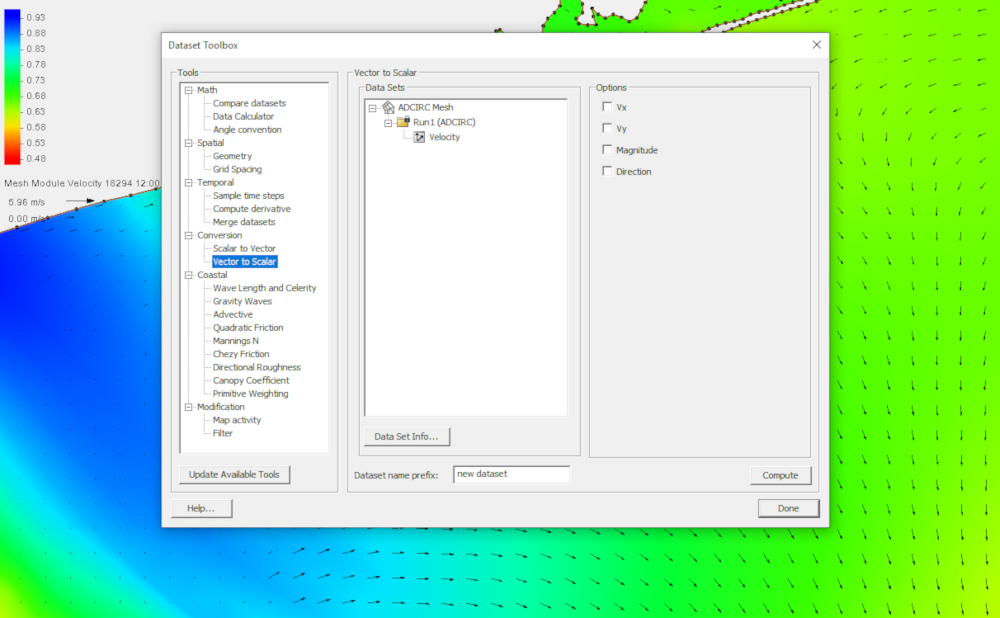
  3. Navigate to the Tools section of the dialog and select either Scalar to Vector or Vector to Scalar.
  4. For the Scalar to Vector tool, select the dataset components to use.
  5. For the Vector to Scalar tool, select whether you want the dataset to be magnitude and velocity, or x and y components in the Options section of the dialog.
Vector to scalar using the Dataset Toolbox

The Dataset Toolbox also contains many other tools. Try them out in SMS today!

Blog tags: 

Tips for Using MODPATH in GMS

MODPATH is designed to work with MOFLOW to show particle tracking information. Using MODPATH can provide valuable information to your groundwater model. With that in mind, here are a couple tips for using MODPATH.

Seeing the Breakdown of Position vs Time

After running MODPATH, you can use GMS to see the breakdown of position vs time.

  • Duplicate your particle set and change the duration for each to correspond to the end of a different time step. This will help visualize when the particles traveled along their pathlines.
  • View the Pathline Report by right-clicking on a particle set in the Project Explorer and selecting the View Pathline Report command.
MODPATH Pathline Report
MODPATH Crashing During a Transient MODFLOW-NWT/UPW Simulation

While MODPATH is quite stable, it can crash when used with some MODFLOW-NWT models. To avoid this, look at the following:

  • When the water level is below the bottom of the cell in MODFLOW-NWT, making the cell dry but not inactive, MODPATH calculations give bad values. Check the cell thickness to see if it is above the water level. Then, inactivate cells above the water level.
  • The alternative workflow, which is not appropriate for every model, would be to change your MODFLOW-NWT model so that either the cells do not go dry, or are set to be inactive from the beginning, which is what this user on this forum post chose to do.
Importing Old Versions of Particle Coordinate Files

GMS has the capability to read in older particle coordinate files. Old versions of the endpoint, pathline, and time series files are automatically detected and read by MODPATH-PLOT. When old particle coordinate files are read, all time step values are automatically set equal to 1 and the particle release time is set equal to 0. The discharge code (IDCODE) for all particles is set to 1 (normally terminated).

Using these tips can increase your MODPATH expertise. Try out MODPATH using GMS today!

Blog tags: 

Exporting Data in CityWater

CityWater allows managing your water distribution network models. As an online application, it allows individuals across the organization to visualize, reference, and analyze existing models in a familiar map-based browser environment while maintaining the data integrity of the model.

When viewing the project details, the Export tab allows three different files to be exported for your use in other applications: a Report Map Shapefile, a Network Map Shapefile, and an EPANET Input File.

Export tab in CityWater

The Report Map Shapefile allows you to select the Variable and Time options to include in the file. For Variable, you can select from head, pressure, quality (links), quality (nodes), demand, pressure swing, velocity, or headloss. The time options include average, minimum, or maximum. Based on the selections, a shapefile with those options will be exported when you click the Export Report Map button.

The Export Network Map button under the Network Map Shapefile option will export a shapefile of the network map, including all the links/pipes, nodes/junctions, and other features. This can then be imported into WMS or any other application that works with distribution networks.

The final option, EPANET Input File, creates an EPANET input file that can be used in any application that can import it. This plain text file contains all the pipe networks information, including pipes, nodes (junctions), pumps, valves, storage tanks, and reservoirs. It also contains additional project and preference information used by the EPANET desktop application.

An additional option allows you to save the current view when in the Map view:

  1. Adjust the map view to how you want it
  2. Right-click anywhere on the map and select Save image as…

This will automatically save the current map view as “download.png” in your downloads location on your computer.

Try out these export features today by logging in at https://portal.aquaveo.com/. If you don’t have an account, use "trycitywater" as the username and password to see an example project.

You can also learn more about using CityWater by watching our tutorial videos.

Blog tags: 

Exporting SRH-2D Results

After completing an SHR-2D model in SMS, are you needing to export the results so that they can be examined by someone not using SMS? SMS provides a few different ways that SHR-2D results can be exported.

ASCII and Binary

The simplest method of exporting SRH-2D results is to export them as either a generic ASCII file or binary file. This is done by doing the following:

  1. In the Project Explorer, right-click on the SRH-2D solution dataset and select Export.
  2. In the Export dialog, select to export the dataset as either a generic ASCII file or a generic binary file.
Shapefile

Shapefiles can be opened by a multitude of programs, making it a useful format to use when sharing your results. To export a dataset as a shapefile, do the following:

  1. In the Project Explorer, select the solution dataset and time step you want to export.
  2. Use the File | Save As command.
  3. In the Save As dialog, change the File Type to be "Shapefile (*.shp)".

The dataset can then be saved using the mesh contours to create either an arch shapefile or a polygon shapefile.

Raster

Raster files are also a file format that can be used by many different programs. To convert your SRH-2D solution sets into a raster file, do the following:

  1. Convert the mesh with the solution sets into a scatter set by using the Data | Mesh to Scatterpoint command.
  2. Select the desired dataset and time step under the converted scatter set.
  3. Right-click on the scatter set and select Convert | Scatter to Raster.
  4. Save out the raster file.
Text File

A delimited text file allows you more control over what is exported. To export your solution set as a text file:

  1. Select the File | Save As command.
  2. In the Save As dialog, change the File Type to be "Tabular Data Files (*.txt)".
  3. Use the Export Tabular Data dialog to specify how the file will be set up, which datasets to export, and which time steps to use.
Exporting SRH-2D datasets as a text file

These are just a few of the ways that SHR-2D solution files could be exported. After exporting the solution set, follow the user guidelines for importing the file into other software. Other file export options are also available, try them out in SMS today!

Blog tags: