Understanding SRH-2D's Monitor Coverage
By aquaveo on January 30, 2024Being able to determine hydraulic parameters at specific locations in the model domain is a handy, and sometimes even necessary, tool for any SRH-2D model. That is why there is a specific coverage in the Surface-water Modeling System (SMS) where you can create monitor objects that will collect the information you need during the simulation run. This blog post will cover some information that you may find useful when trying to make the most out of your monitor coverage.
SRH-2D outputs monitor data at a fixed interval of every 100 time steps. This is important to keep in mind if you’re looking to collect a certain amount of data from your monitor points or lines. You may need to adjust the size of the time steps depending on what kind of output you need.
Monitor Points
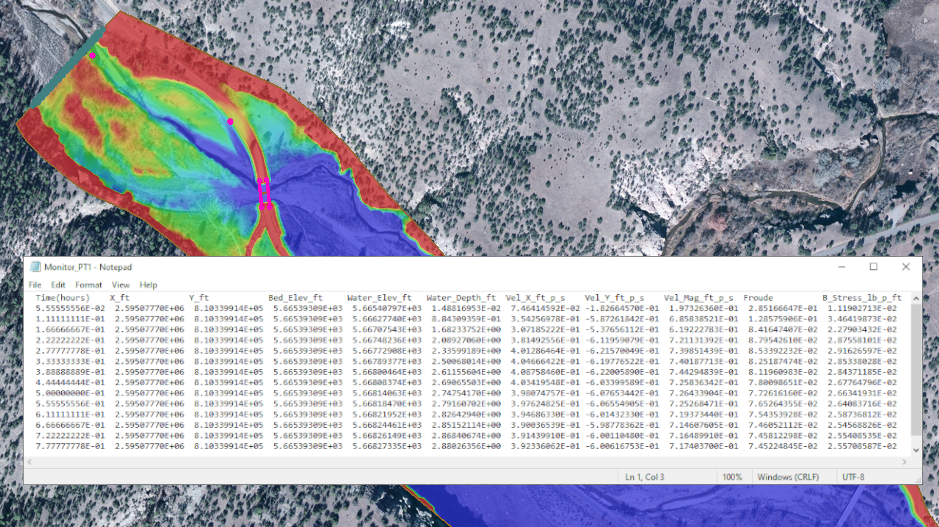
When creating monitor points on the SRH-2D monitor coverage, it is recommended that you create at least three monitor points: one near each end of the model domain, and one in the middle. During the simulation run, SRH-2D collects data at the points about a number of things, including but not limited to: the position in the X and Y direction, bed elevation, water elevation, and water depth.
Monitor Lines
Monitor lines can help you verify the continuity and model stability of your SRH-2D simulation. SRH-2D uses monitor lines to calculate the total flow and average water surface elevation along the arc. Monitor lines work best when they cross a river rather than running parallel. Lines with too many curves can cause difficulties in snapping to the mesh properly. Monitor lines can be placed anywhere along a river, but we recommend that one be created near the inflow and outflow boundaries. Remember to use monitor lines judiciously. Too many monitor lines can bog down your simulation, or even keep it from converging properly.
Monitor Output Files
Monitor output files are automatically exported to the location of the project files using this directory format: \[Project_Name]_models\SRH-2D\[Simulation_Name]\Output_Misc. The Output_Misc folder contains a DAT file for each of the monitor features using the *[Simulation_Name]_LNn.dat naming convention for lines, and *[Simulation_Name]_PTn.dat for points. These files contain all the data for each individual point or line, and can be opened in your prefered text editor application.
SRH-2D Solution Plots
We covered how SRH-2D solution and monitor plots work in a blog post a while back. If you’re interested in learning more about solution and monitor plots and how to use them, follow this link to our website.
Head over to SMS and try out the monitor coverage with your SRH-2D model today!