Aquaveo & Water Resources Engineering News

Importing SRH-2D Native Files

Did someone send you files for an SRH-2D project but they are not part of an SMS project? You can import native SRH-2D files directly into SMS even when there is no associated SMS project file. This blog post will go into more detail as to how this is done.

First, make certain you have all of the SRH-2D files in the same directory. To review, the native SRH-2D input files include the following:

  • SRHGEOM: contains the mesh geometry
  • SRHHYDRO: contains the SHR-2D model control parameters
  • SRHMAT: contains the mesh material data
  • SRHSEDMAT: contains the sediment material properties
  • SRHMPOINT: contains monitor point data
  • XYS: contains any XY series data used in the project

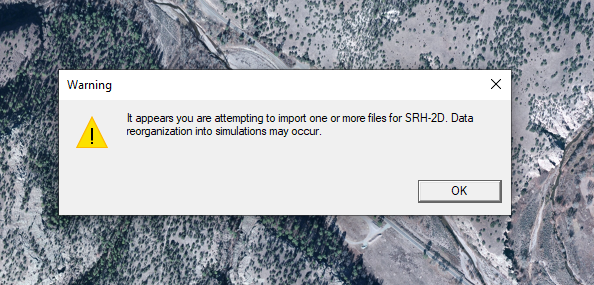
After you have all of the needed files, you can import the SRH-2D project by opening the SRHHYDRO file. When opening the SRHHYDRO file, a warning message will appear letting you know that some data reorganization may occur.

Import SRH-2D native files warning

When importing the SRHHYDRO file, SMS will search the directory for other files related to the SRH-2D project. As long as the files are in the same directory and use the same naming convention, the SHR-2D project will be imported into SMS.

Solution files and other output files will need to be imported separately into SMS. This includes the XMDF.h5 file.

After importing the native project files, it is strongly recommended to review how the simulations have been set up in SMS. Check the boundary conditions and materials to make certain they imported correctly. Also, you may need to import certain input files, such as a restart file, separately to complete the simulation setup.

You may also need to clean up the project to make using it easier in SMS--this may include renaming items in the Project Explorer or adjusting the display. Also, it should be noted that SMS allows you to import multiple SRH-2D projects into the same SMS project.

Try out importing SRH-2D native files into SMS 13.1 today!

Blog tags: 

Refining 3D Grids in GMS

It's common to need to refine part of a grid in your GMS project. For this reason, GMS provides a few tools and methods for refining parts of a grid. This post will review some of the options for refining 3D grids in GMS.

In general, when building a grid in GMS, you don’t want a grid that is too refined, as this will cause issues in the model run. You also do not want a grid that has cells that are too large to pick up vital information from key locations. To solve this, you can refine the grid in key locations.

When generating a 3D grid or unstructured grid (UGrid) from a map coverage, you can use refinement points to refine specific locations. Refinement points require setting the map coverage up to have the Refinement option turned on. Then create points on the map coverage and define those points as refinement points. When converting the map coverage to a grid, the grid will be refined in the area of the points.

Defining a Refine Point in GMS

With an existing 3D grid, IJK boundaries can be added into the grid to refine an area. You can do this by using the Select i, Select j, or Select k tools to select a row, column, or layer, then right-click and select the Redistribute command. In addition, you can use the Grid | Redistribute layers command to redistribute layers.

If you have an existing UGrid, you can quickly refine the grid on a cell-by-cell basis. You do this by selecting a cell, then right-clicking and selecting the Refine cell command.

The above techniques work well for refining a small area of the grid or when refining grids that are not complex. Again, it is not recommended to overly refine a grid as this often causes issues to appear during the model run. If you do need to refine a large area of the grid, it is recommended to use a child grid.

Try out using the grid refinement tools in GMS today!

Blog tags: 

New Features to Check Out in WMS 11.1

Aquaveo is pleased to announce the release of the Watershed Modeling System 11.1 Beta! With this release, WMS contains changes and improvements to some of the features. If you have already downloaded WMS 11.1 beta, you might have already noticed some of the changes. We'd like to highlight a sampling of some of the new functionality you can expect to find in WMS 11.1.

GIS Module

A lot of the GIS module functionality has been made to perform faster. This includes performing GIS parameter computations directly from shapefiles, performing shapefile to feature object conversion, and displaying large raster files. Also added the GIS module, through the new Online Maps feature, there has been an addition of Web-based Google tile map services that can be displayed as background maps. Improvements have also been made to the list of many potential online sources that can be used as data sources for the online maps. There have also been changes to the display and operations on images and raster files of various types.

Raster of West Virginia
GSSHA

The capabilities of GSSHA model implementation have been expanded within this new release. These include the ability to view multiple scenario hydrographs in a GSSHA solution and the added capability to run calibration on Richard's Equation parameters within GSSHA.

Map Data Module

More options have also been extended when it comes to the Map Data module. A new Extract Features tool allows users to directly convert raster data to stream and ridge/embankment centerlines. In addition to new tools, the Map flood tool has added an option to use local shapefiles that can be used when web service data are not available, where those shapefiles can be used for Base Flood Elevations and floodplain boundary polygons.

These are just a few of the new features in the WMS 11.1 Beta. Try out these features and more by downloading the WMS 11.1 Beta today!

Blog tags: 

Reintroducing HEC-RAS 1D in SMS

Earlier versions of SMS allowed modeling HEC-RAS 1D models. HEC-RAS 1D is used for performing water quality analysis. Though once part of SMS, it was removed because it was supported by Aquaveo's Watershed Modeling Software (WMS). However, with the inclusion of HEC-RAS 2D, the interface for HEC-RAS 1D has been restored into SMS 13.1.

Using HEC-RAS 1D in SMS primarily makes use of the 1D hydraulic centerline coverage and the 1D hydraulic cross section coverages. It also makes use of the material coverages, with the added bonus of now being able to use SRH-2D material coverages. Once you have defined the materials, centerline and cross sections in your project, you can switch to the 1D Module. The 1D Module has also been reintroduced in SMS 13.1.

Example of HEC-RAS 1D in SMS

Once in the 1D Module, you can access the HEC-RAS 1D menu where you can find the HEC-RAS 1D materials and model control. SMS allows you to select the material coverage to use for HEC-RAS 1D, and then assign that material coverage to the HEC-RAS 1D model. After you have set up your HEC-RAS 1D model in SMS, you can export a project file to use in HEC-RAS.

With HEC-RAS 1D in SMS, you can take advantage of all the tools offered in SMS to build your HEC-RAS 1D project. This includes tools to extract cross sections and centerlines from imported data or existing projects. SMS's editing tools can also be used to adjust the centerline or cross section before importing the project into HEC-RAS. Furthermore, SMS allows you to use profile plots and the various viewing options to review your cross sectional data. It is recommended that you review your HEC-RAS 1D project in SMS before exporting the project file.

HEC-RAS and SMS together increase your water modeling options. Try out using the reintroduced HEC-RAS 1D in SMS 13.1 today!

Blog tags: