Aquaveo & Water Resources Engineering News

Tips for Using the Hydrologic Modeling Wizard
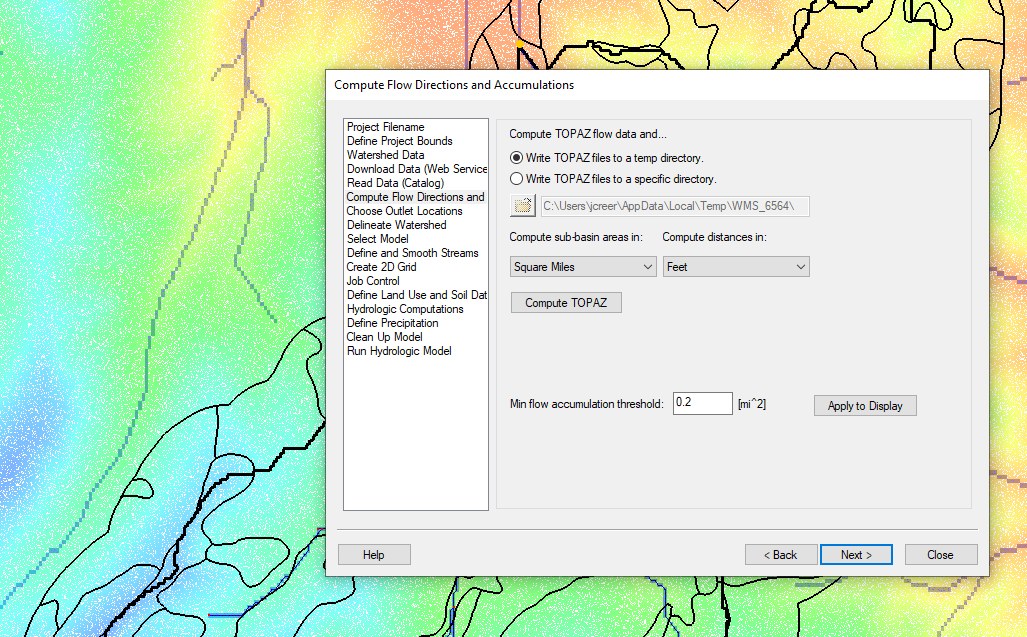
WMS makes creating hydrologic models easier by providing the Hydrologic Modeling Wizard. This tool steps you through the process of developing a hydrologic model. Each step completes one of the elements needed for a complete hydrologic model. To make using this tool easier and more productive, here are a couple tips for using the Hydrologic Modeling Wizard in WMS.

Example of the Hydrologic Modeling Wizard

The first tip is that the Hydrologic Modeling Wizard is modular in nature. This means the wizard does not need to be closed in order to continue working in the WMS interface, unlike many other windows and dialogues in WMS. The wizard can be put to the side of your screen to let you work with other tools in WMS. Often this is necessary to adjust arcs in the Graphics Window or to import additional data. Once you are done with what you need to do, you can return to the Hydrologic Modeling Wizard.

It should also be noted that the Hydrologic Modeling Wizard keeps track of changes as you work in it. So if you should happen to close it, you can reopen it and get back to where you left off. However, you should make certain to save your WMS project before closing WMS in order to save changes made in the wizard to your WMS project.

Another tip is that you do not need to complete all of the steps in order. Some steps can be completed out of order. For example you may want to set the model you are using before completing earlier steps. Or, more often, you may have completed earlier steps outside of the wizard, letting you skip to later steps. That said, there are some steps that will not work unless a previous step has been completed.

Also note that you can always go back to earlier steps. Note that when doing this some steps that follow may have to be completed again.

The Hydrologic Modeling Wizard is a powerful tool to help you create hydrologic models faster. The tips presented here can also be applied to the other modeling wizards in WMS. Try out the Hydrologic Modeling Wizard in WMS today!

Blog tags: 

Exporting Map Data to a Shapefile

Feature objects in SMS resemble the objects in shapefiles in many ways. Shapefiles are a file format used by many GIS applications. Starting in SMS 13.1, feature objects in SMS can be directly exported into shapefiles.

SMS 13.1 allows points, arcs, and polygons to be exported from a specified map coverage to shapefile. This done by doing the following:

  1. Select the desired map coverage in the Project Explorer to make it active. It is recommended that you hide any map coverages you don’t want exported.
  2. Right-click on the coverage and select Export.
  3. In the Export Coverage dialog, select the direction where you want to save the shapefile, enter the shapefile name, and select which type of shapefile to use.
Exporting a coverage to a shapefile

Be certain to select the correct file type when exporting feature objects. Only the matching feature object type will be exported to a shapefile from the coverage. SMS allows you to export feature points as a points shapefile, feature arcs as a line shapefile, and feature polygons as a polygon shapefile.

It is also recommended to review the feature objects on the coverage before exporting to a shapefile. Individual feature objects cannot be exported at this time, therefore, it is advisable to remove any unwanted features before exported. This can be done by duplicating the map coverage and then deleting the unwanted feature objects.

If desired, you can import the exported shapefile into SMS. The shapefile will appear in the GIS module and can then be compared with the feature objects on original map coverage. Otherwise the shapefile is ready to be imported into the desired application.

It should be noted that not all data on map coverages can be exported into a shapefile format. Some data, such as boundary conditions attributes or coverage specific settings, may not end being exported.

Try out creating shapefiles from feature objects in the SMS 13.1 beta today!

Blog tags: 

Tips for Importing Wells to the Conceptual Model

In many MODFLOW projects, having the correct placement and settings for wells is important for getting correct results. GMS facilitates the implementation of wells by allowing well data to be imported directly into the conceptual model. This article gives an overview of importing well data directly into the conceptual model along with some tips.

Importing wells directly into the conceptual model first requires that the wells be in a file with the correct format. Typically this is a text file. Please refer to our wiki article for the correct format that GMS will use.

Other file formats, such as shapefiles, are also common, but often cannot be imported directly into the conceptual model. These other formats will import the wells into a different module, such as the GIS module, and will need to be converted over to the conceptual model.

Before importing well data into the conceptual model, make certain you have an existing map coverage with the well option turned on. Without this, the well data cannot be imported directly to the conceptual model.

When importing well data in a text file, you will use the Open command then the Import File Wizard. In the second step of the File Import Wizard, you must select "Well data" for the GMS data type. Also in the second step, make certain all the data columns are correctly assigned. Failing to assign the data columns correctly can result in errors.

Importing a well file into GMS

It should be noted that you are not limited to the number of data columns you have in the file. Therefore, you can import multiple wells at the same time. You can also import multiple time series or other data applicable to the wells using this method. Please note that while the wells and time series can be defined in the same text file, it is necessary to import the file twice: once to create the wells, and once to assign the time series to the wells. Constant flow rates can be imported at the time of well creation.

Review the well data after it has been imported. That can be done quickly by bringing up the coverage attribute table dialog for the wells. If the data was not imported correctly, minor changes can be made in using the tools in GMS.

Try out importing well data directly into the conceptual model using GMS today!

Blog tags: 

Converting Soil Data to an Index Map

Do you need to add soil data to your GSSHA model in WMS? Soil data is often needed in a rainfall/runoff GSSHA model so that infiltration can be considered in the model. WMS makes this easy by allowing soil data to be converted to an index map.

In order to include soil data in your GSSHA model, there are few steps to follow.

First, you will need a soil data map coverage. Once this coverage has been created you can add soil data directly to the map coverage. Often, you may have soil data located on a shapefile or other source. The soil data on the shapefile needs to be mapped over to the soil data coverage before creating the index map.

Second, the index map will be included with a 2D grid for the GSSHA model in WMS. Make certain you have created your 2D grid and initiated your GSSHA model.

Finally, convert the soil data coverage to be an index map in your GSSHA project. This is done by doing the following:

  1. Use the GSSHA | Maps command.
  2. In the GSSHA Maps dialog, set the soil data coverage to be used.
  3. Click the Coverages to Index Map button.
Soil data converted to an index map

Once you have converted your soil data to an index map, you can use it in your GSSHA model.

When converting soil data to an index map, we do have some tips to make it go smoother.

  • When converting a shapefile to a soil data coverage, make certain that the soil data with the shapefile has been joined to the shapefile.
  • After mapping a shapefile to a soil data coverage, make certain that the soil data mapped over.
  • Check to see if soil covers the entire area of the 2D grid. A warning may appear if the soil data does not cover the area of the 2D grid.

Once your soil data have been successfully converted to an index map, it is ready to be used in your GSSHA model.

Try out using soil data with GSSHA in WMS today!

Blog tags: