Aquaveo & Water Resources Engineering News

Quickly Delineating a Floodplain

How many watershed projects require knowing which areas are in a floodplain? There is a lot of debate over building on floodplains, but before that debate can happen, the location of the floodplain needs to be known.

A new feature in WMS makes this process quick and simple.

The Map Flood tool utilizes ground elevations and existing flood hazard maps from the Federal Emergency Management Agency (FEMA) to quickly visualize the impacts of possible modifications in the flood level. The tool is designed to utilize data from web services including ground elevations, flood hazard base flood elevations, and flood hazard floodplain extents.

The Map Flood tool is accessed by clicking on the Map Flood icon in the toolbar.

Running the tool will do the following:

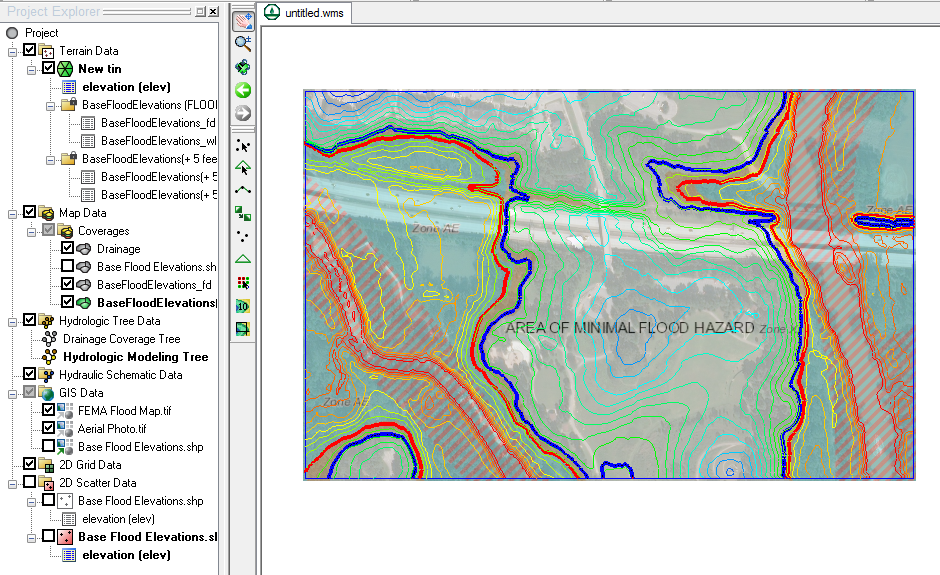
  • Download elevation data for the area which is stored as a scatter set
  • Download base flood elevation lines for the area which is stored as a map coverage
  • Download a flood extents polygon which is stored as a map coverage
  • Download a flood insurance map as a image in the GIS module
  • Create a water surface elevation for the base flood
  • Create an offset water surface elevation for the modified flood level
  • Compute a new flood extent polygon for modified flood level

For locations that do not have FEMA data, you can use your own data to generate flood extents. As long as a ground elevation dataset and a water surface elevation have been imported into a WMS project, then the Map Flood tool can be used to create a fast floodplain. This data needs to be imported into WMS as either a 2D scatter set or a TIN.

Using the new Map Flood tool can greatly reduce the time it takes to delineate a floodplain. Try out the new Map Flood tool in WMS 11.0 today!

Blog tags: 

What We Learned at the 2018 Aquaveo User Conference

Aquaveo held its first annual User Conference from October 16-17, 2018! It was amazing to get to meet so many of our users at once. We hope everyone had a great time.

For us, it was exciting to meet users from all over the world. We met users from the United States, Canada, Portugal, Germany, the United Arab Emirates, Guyana, and Thailand. When asked why they came, the attendees said they came to learn:

  • How Aquaveo’s products can help with their projects
  • More of what Aquaveo has to offer
  • What Aquaveo is all about

In listening to what our users had to share with us, we took away a couple key items that you want to see improved in our software.

  1. You want modeling to go faster. We understand the demand to give results in less time is growing, so we will be looking at ways to make the process of modeling take less time and still be accurate. Some of the innovations added into Aquaveo’s software already significantly reduce the time it takes to complete a model. We hope to add more automation and tools to speed up modeling times.
  2. You need to be able to work with big data. More data is becoming available and you want to be able to use it. This means processing large files covering larger areas in more detail. At Aquaveo, we are working on doing this, including optimizing our code and adding new tools to work with large files such as lidar files.

We’d like to thank the following for participating in our user conference:

If you couldn’t make it to the Aquaveo User Conference this year, we will be having another one next year. Watch our website and Facebook page for future details. See you next year!

5 New Features in SMS 13.0 Beta

We’re happy to announce the beta version of SMS 13.0 is now available. Our developers have been working hard to improve SMS to make the user experience more enjoyable.

To help you learn about some of the new features, we’ve compiled this list of three new features in SMS 13.0 Beta.

  1. Notes can now be added to Properties dialog. Right-clicking on most items in the Project Explorer now have a Properties command that will bring up a dialog with a Notes tab. We have found many uses for this, including making notes about the differences between different map coverages or scatter sets.
  2. New tools to support the use of lidar data. You might have used lidar files in the past and noticed that the interface was a little confusing and sometimes slow. After examining how the process could be improved, we made improvements to the import process and changed how SMS interacts with lidar data. We hope you find our new lidar functionality is both faster and makes working with lidar data easier.
  3. A bridge scour coverage has been added. This allows exporting bridge scour values to the Hydraulic Toolbox to use in analyzing a bridge site. This tool requires having a 2D mesh with elevation data, a water surface elevation, a water depth, and velocity datasets. Most of the values needed will be automatically generated, making bridge scouring faster and easier.
  4. Floodplain delineation has been improved using the Map Flood tool. This tool allows accessing FEMA data to automatically designate flood areas in your project. The tool can also work with local data provided as a scatter set.
  5. A 2D scatter set can now be converted into a raster file. Right-clicking on scatter set item in the Project Explorer now has a new Raster -> Scatter command. Creating a raster from your scatter data can help facilitate sharing data across different applications.

These are only some of the many new and updated features in SMS 13.0 Beta. You can find a bigger list of them here. Along with these new features, we are also excited to offer new tutorials instructing users on how to best utilize the new features. Try out the beta by downloading it today!

Blog tags: 

Performing a Silent Install of XMS

This blog post provides information on older password and hardware lock configurations.
Information on new local and flex codes may be found here.

Are you an IT administrator needing to perform a silent install of GMS, SMS, or WMS in a classroom or office? Some classrooms and offices have multiple students or employees changing machines regularly. Non-administrator users are often unable to change the licensing password, lock, or server when these license settings are stored in the global area of the registry. Because of this, we changed the license settings so they are now stored in the user area of the registry. This means that each user account requires this to be setup.

This silent install (or quiet install) workaround requires each user to have the rights to modify the registry. If registry access is restricted, a network administrator can do this by opening the Group Policy Management Editor and creating a startup script that automatically runs the batch file whenever the computer is restarted.

Note: Editing the Registry in Windows is a very advanced administration step. Please always create a backup of the Registry before making changes.

It can be a burden have to manually update the network lock server address in HKEY_CURRENT_USER for each user on each computer. The silent install process is simplified by creating a Windows Registry file that contains the license information and a batch file that can be executed to insert the registry information and launch WMS. The batch file automatically updates the registry for the user and then opens the WMS application. This is the safest way to edit the registry key, as well. The batch file can then be placed on each computer that needs to be updated, and the individual users can execute it as needed.

This workaround uses WMS as an example. This information also applies to GMS and SMS. You can see an example of a registry file in step 1 and the batch file in step 2, below.

  1. Create a file, “Netenble.001.reg”, as follows, replacing "license" with the name or IP address of the network lock server. For example, if the network lock server was at 127.0.0.27, you would use “127.0.0.27”:
    Windows Registry Editor Version 5.00M
    [HKEY_CURRENT_USER\Software\EMRL\WMS]
    "Netenble.001"="license"

    Note: This information was created using Windows 7. Because different Windows versions can have different REG file formats, we recommend you install WMS on one machine, register it to the correct network lock server, then export the [HKEY_CURRENT_USER\Software\EMRL\WMS] registry key. Open the registry file in the text editor and remove every line except those similar to those shown in the image above, and save the file as “Netenble.001.reg”.
  2. Create a file, “wms11.bat”, that will update the registry and start WMS: reg import Netenble.001.reg
    wms.exe
  3. Place these two files in the WMS folder in the image that will be distributed to the affected computers. For example, for the 64-bit version of WMS 11.0, the default location for the folder is “C:\Program Files\WMS 11.0 64-bit\”.
  4. Create a desktop shortcut to the batch file for the convenience of the user. If doing this via a startup script in the Group Policy Management Editor, this step can be skipped.

This silent install workaround can save you significant time as a network administrator. Try it out today!

GMS Training in Hannover, Germany

The German Federal Institute for Geosciences and Natural Resources (Bundesanstalt für Geowissenschaften und Rohstoffe, or BGR) hosted a GMS training class in Hannover, Germany from July 31 to August 3, 2018. It was taught by Todd Wood, an Aquaveo consultant, and attended by employees of BGR and the Jordanian Ministry of Water and Irrigation (MWI).

The first day of the four-day training included instruction on the basics of using GMS, including conceptual model development, defining boundary conditions, and the differences between 2D and 3D modeling. Discussion of MODFLOW and its many packages took up the majority of the first day.

The second day’s training focused on working with regional MODFLOW models (including base maps, conceptual models, and conductance), 2D geostatistics with MODFLOW layer elevations, and interpolation methods. The third day of training covered characterization using borehole data, user-defined cross-sections and horizons, as well as an introduction to model calibration.

The final day of training included automated calibration tools in GMS, including the use of PEST and transient modeling. The day ended with an open lab where participants could work on their own projects with Todd being available to answer questions and help.

We appreciate Falk Lindenmaier and Mark Gropius for arranging the training session for BGR and MWI, and thank you to all of those who attended the training. We love meeting new people and helping them to use GMS more effectively!

While in Hannover, Todd was able to see some of the sights with those attending the training. They visited the municipal forest known as Eilenriede, the Herrenhausen Gardens, Georgengarten, the Maschsee (an artificial lake), and the New Town Hall. Hannover has some truly beautiful locations.

To arrange your own GMS training session, please see the Aquaveo website.

Blog tags: