WMS

Downloading NLCD Data

One of the crucial elements of any project is having data. WMS makes use of a large number of data sources. One type of data that we find frequently used is National Land Cover Database (NLCD) data. NLCD is provided by the MRLC (Multi-Resolution Land Characteristics Consortium) as a large collection of raster datasets.

Here are three ways this data can be imported into WMS.

Direct Download

NLCD data can be downloaded from the MRLC site. Much of the other data available on the MRLC site can also be used with WMS.

Downloaded NLCD data can be opened in WMS by selecting the Open macro, browsing to the folder containing the downloaded data, and selecting the desired raster. WMS should be able to recognize the data file and bring it into your project.

Using the Modeling Wizard

NLCD data can also be downloaded while using the Hydrologic Modeling Wizard or the HY-8 Modeling Wizard. To do this:

  1. Start the Hydrologic Modeling Wizard or the HY-8 Modeling Wizard
  2. Create the project in the first step
  3. Define your project bounds and set the project projection
  4. In the Watershed Data step, turn on the Use web services option
  5. In the Download Data (Web Services) step, select one of the NLCD data types
  6. Click the Download Data From Web button to download and import your NLCD data
  7. Enter a raster cell size for the data
  8. Save the data as a file
Using the Get Data Tool

Downloading NLCD data can also be obtained by using the Get Data tool. To use this tool, your project must have a projection already defined. When you have a projection set, do the following:

  1. Using the Get Data tool, click-and-drag a box in the Graphics Window that covers the area where you want NLCD data
  2. Save a file with the NLCD data
  3. Enter the raster cell size for the data
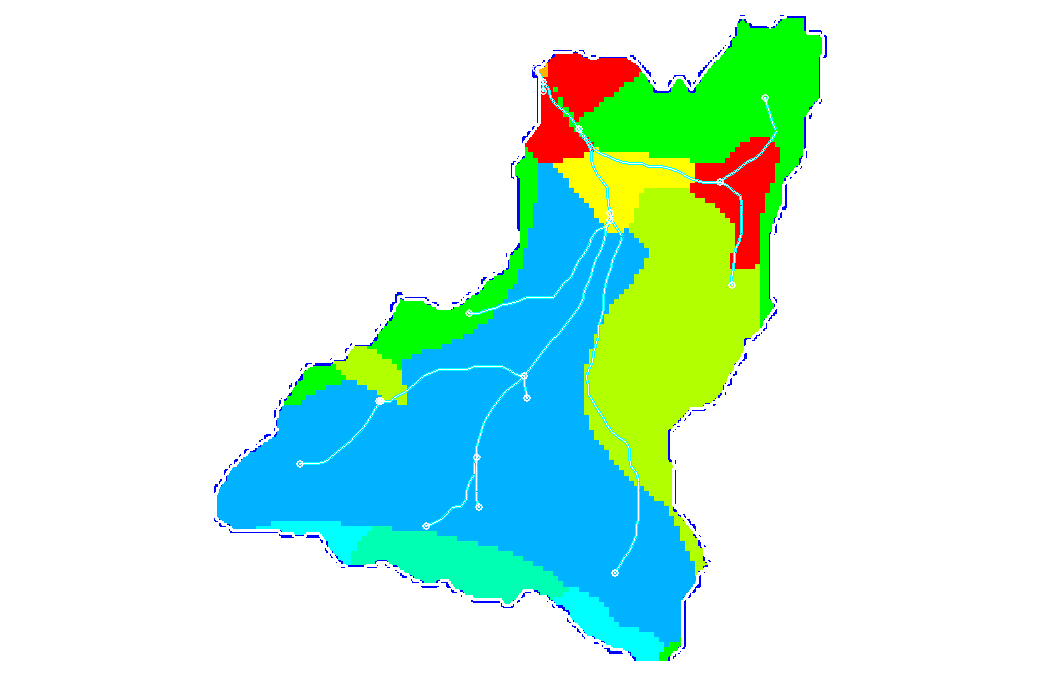
Downloading NLCD data

You might also notice that a lot of other data sources are available through the Modeling Wizard and Get Data tool. Feel free to try downloading data from these sources for your WMS projects.

Blog tags: 

Using Advanced Data Services Options

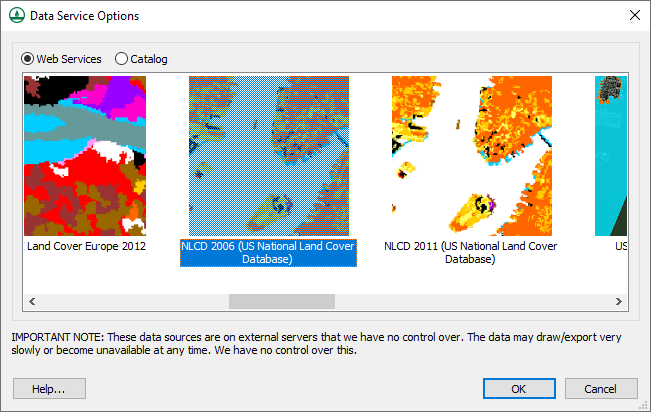
In the current versions of GMS, SMS, and WMS, the data service options for importing online maps has changed. It was noted by some of our users that the Advanced option for the Data Services Options dialog was removed.

We are happy to say that the advanced options for the Data Services Options dialog has been restored. The new advanced options are only available when using the Import from Web command in the release of GMS, SMS, and WMS that went out at the beginning of May 2019.

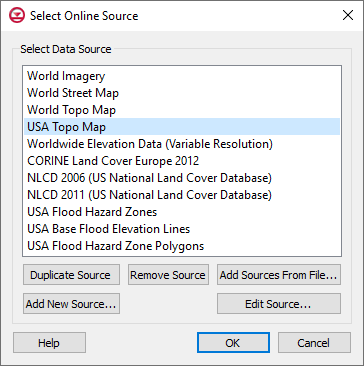
To access the Advanced options from the Data Services Options dialog, click the Advanced button, just as before, to bring up the Select Online Source dialog. This dialog allows users to bring in new data sources for downloading data.

Select Online Source Dialog

Adding new data sources to the Select Online Source dialog can be done in any of three ways:

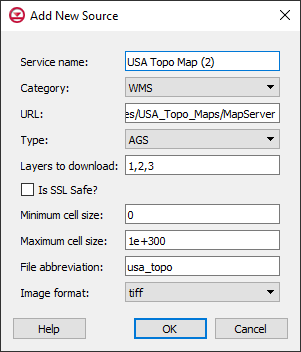
    Add New Source Dialog
  1. The Select Online Source dialog contains a list of all of the data sources currently available. You can select one of these sources and click the Duplicate Source button to create a copy of the data source. Then, with the copy selected, click the Edit Source button to reach a dialog where you can make modifications to the source such as limiting the layers downloaded from the source or changing the image format downloaded from the source.
  2. You can click the Add New Source button to reach a dialog where you can specify the url of a new data source along with any modifications.
  3. Finally, if you have an Online Source File with the information needed to reach a source, you can click the Add Sources from File to add the source to the available list.

Sources can be deleted from the available list by selecting a source in the list and clicking the Remove Source button. Only sources that have been manually added can be removed or edited.

To get access to the new advanced options for the Data Services Options dialog, visit our downloads page today.

Blog tags: 

Modeling a Dam in GSSHA

Do you have a project that requires modeling a dam, or similar structure, in GSSHA? WMS can make this process smoother with tools designed to help define the structure quickly and efficiently.

In order to create a simulation that includes modeling the dam in WMS and analyzing the dam’s effects using GSSHA, the workflow is as follows:

  1. Import an existing GSSHA base model.
  2. In the GSSHA map coverage, use the Shift key to select the node where you want the dam to be and the node immediately downstream from it.
  3. Right-click on the selected nodes and select Attributes to open a Properties dialog.
  4. Select Output Hydrographs at those nodes.
  5. Run GSSHA.
  6. Using the results from the GSSHA run, size your embankment based on the necessary storage.
  7. Using the Create Feature Arc tool, create an arc to represent your dam.
  8. Double-click on the arc to bring up the Attributes dialog.
  9. Set the type of arc to be an Embankment, then click the ... button next to it to open the Embankment Arc Profile Editor dialog.
    1. Set the PVI Elevation to be the height of the dam.
    2. Click Compute Vertical Curve to compute the Curve Length.
  10. Double-click the node in the stream where your structures will be defined to open the Properties dialog.
  11. Click the button under Hydraulic structures to open the GSSHA Hydraulic Structures dialog.
    1. Add a Detention Basin, Weir and Culvert.
    2. Define the attributes for each of these structures.
  12. Run GSSHA again to see the effects of the dam you have created.
GSSHA Dam Modeled in WMS

If needed, adjust the display options when reviewing the results to get a better idea of how the dam structure affected the results. Try different various options to get a better feel of how the dam affected the simulation results.

Now that you know how to add a dam to GSSHA, try out modeling dam structures and other applications in WMS today!
Blog tags: 

Modeling a Dam in WMS for Use in HEC-HMS

Do you have a project that requires modeling a dam, or similar structure, in HEC-HMS? WMS can make this process smoother with tools designed to help define the structure quickly and efficiently.

This blog presents a workflow for modeling a dam in WMS to later analyze in HEC-HMS. The workflow is as follows:

  1. Begin with a delineated watershed with attributes defined.
  2. Determine where you would like to place your reservoir and place an outlet point there.
  3. Delineate your watershed and compute basin attributes using your new outlet point.
  4. Create a simulation in HEC-HMS and compare the runoff from the upper basin to the lower basin in order to size your reservoir.
  5. Convert the outlet node to a reservoir.
    1. Switch to Hydrologic Modeling Module.
    2. Using Select outlet tool, select the outlet at the location where you want to model a reservoir.
    3. Right-click and select Add | Reservoir.
  6. Select Calculators | Detention Basins.
  7. Click Define to bring up Storage Capacity Input.
    1. For a dam: Use DEM and enter the height of the desired dam.
    2. Click OK to exit Storage Capacity Input dialog. The Detention Basin Analysis dialog will appear.
    3. Define the storage curve for your reservoir.
    4. Click Map to Hydrologic Model to open Map to Model. Name the series as desired.
  8. Double-click on the reservoir point to open the HMS Properties dialog.
    1. Here, you can choose the storage curve defined earlier, and define all other curves.
    2. To add an orifice to your dam, select Orifice Outlet from the Outlet Type drop-down.
      1. Define the orifice Center Elevation, Cross-sectional Area, and Discharge Coefficient.
    3. To add a spillway, select Broadcrested Spillway or Ogee Spillway from the Spillway Type drop-down.
      1. Define the required characteristics for the selected spillway.
    4. You can also choose to model an overflow type and dam break type if desired.

With the dam, spillway and orifice defined, you can now run your model through HEC-HMS again to see how your reservoir will perform under the selected storm.

Dam analysis in HEC-HMS

Try out modeling dam structures and other applications in WMS today!

Blog tags: 

Pages