Aquaveo & Water Resources Engineering News

Converting a 2D Scatter to a Raster

Have you ever needed to convert a 2D scatter set to a raster? A new feature of SMS 13.0 allows converting a 2D scatter set to a raster from the right-click menu in the Project Explorer.

Being able to convert from a 2D scatter set to a raster is particularly useful when collaborating with a colleague, or switching between programs. There are many types of raster files that can be shared between different applications.

To convert a 2D Scatter right-click on the 2D Scatter Set under Scatter Data folder in the Project Explorer and go to Convert | Scatter → Raster.

In the Interpolate to Raster dialog you have three options for Interpolation:

  • Linear
  • Inverse Distance Weighted
  • Natural Neighbor

Each option for interpolation is slightly different from the other focusing more on lower z values, higher z values, or the x and y values. Feel free to compare all three with your 2D scatter set.

Once you have selected the interpolation type you can choose to truncate some of the data by clicking on the Options button to launch the Interpolate dialog. Using the truncating option removes data from your raster. Some scenarios many only be visible in Plan view.

When you have selected your interpolation method, and truncation value if you so desire, then selecting OK will direct you to saving your raster file. You have two file type options:

  • Geo TIFF Tiles (*.tif)
  • Arch Info ASCII Grid Files (*.asc)

If you select the ASCII file type you may be asked to select a global projection, whereas the TIFF option does not. By default the raster will be imported into your current project.

When converting a scatter set to a raster the program may need to make some adjustments to outlying points. With each of the interpolation options, SMS adjusts the data for slightly different raster results.

You can see that the converted raster closely reflects the original dataset. The scale on the left of the Graphic Window will show you how closely the two are alike.
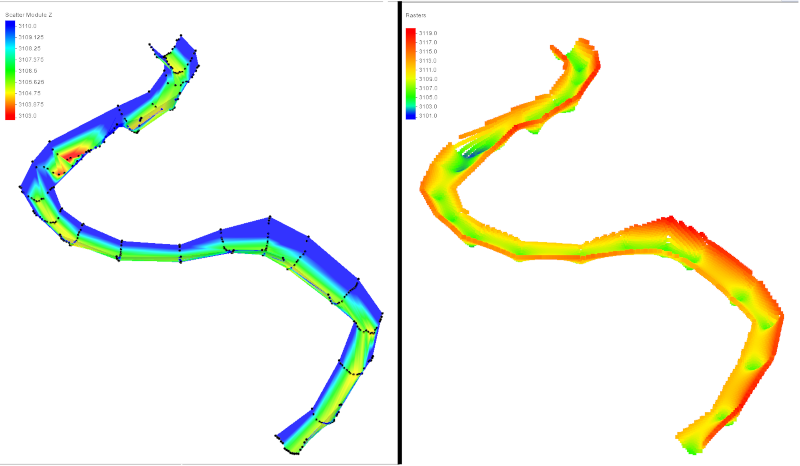
2D raster to scatter example

Now that you know how easy it is to convert a 2D scatter set to a raster try it in SMS today!

Blog tags: 

Aquaveo User Conference 2019

The 2019 Aquaveo User Conference is going on now. It started yesterday, October 8th, and will wrap up today, October 9th. We are enjoying meeting with users from around the world. In attendance are users from the United States, Germany, Portugal, South Africa, and other places around the globe.

At the conference, we announced some of the new features and upcoming changes to our products that we are excited about:

  • Making XMS functionality available for use outside of the traditional interface.
  • More web-based applications for portability and ease of access.
  • Simplifying and unifying tools so it is easier to find and use the functionalities available.
  • Project management tools to track the history of a model.
  • 3D bridge modeling in SMS.
2019 Aquaveo User Conference

Talking to those in attendance, we learned they enjoyed:

  • Learning more about software features and functionality.
  • Learning how to improve their model development process.
  • Discovering benefits of Aquaveo’s software over other software.
  • Talking to developers and learning tips for model development.
  • Being able to show off their models and receive feedback on them.
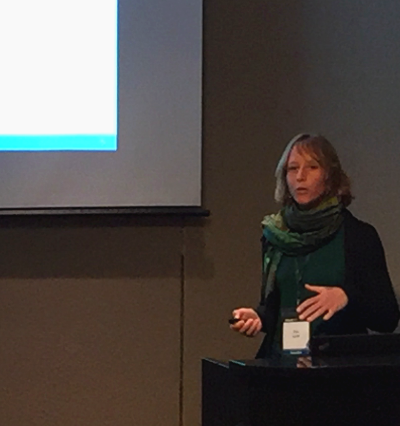
Eva Loch presenting at the 2019 Aquaveo User Conference

We’d like the thank the following for participating during our user conference:

If you couldn’t make it to the Aquaveo User Conference this year, watch our website and Facebook page for future conferences.

Classifying Material Zones

Do you ever struggle to assign materials to a grid from solids? In GMS, the Solids to MODFLOW command is a useful tool for this, but it’s not successful in all cases. This command can sometimes make alterations to the stratigraphy. The command also does not work with models that make use of a mesh.

The good news is, there is another way! The Classify Material Zones command allows you to assign material zones from solids to a grid using just a few steps. The general workflow for doing this is as follows:

  1. First, you'll want to create a grid or mesh that is the same shape and has as many layers as your solids.
  2. Next, right-click on your grid and choose the Classify Material Zones command.
  3. In the Classify Material Zones dialog, ensure that your solids are selected and choose your desired classify algorithm.
  4. Finally, click OK and your grid materials will be matched to the solids.

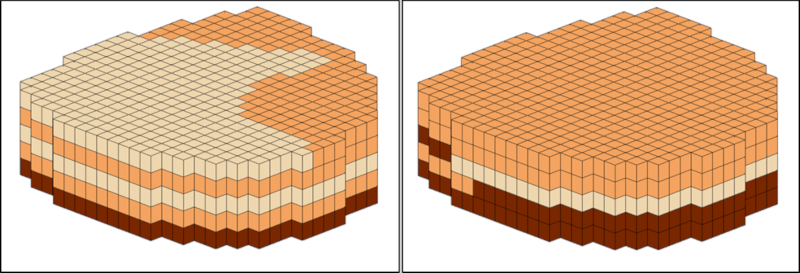
When setting the classify algorithm, there are two options: "Centroid" and "Predominant material". The "Centroid" option assigns each cell the material located at its centroid. Using the "Predominant material" option assigns each cell the material that is present in the highest volume.

Below is a comparison between the two classify algorithms on a sample grid, "Centroid" on the left and "Predominant material" on the right. Select the algorithm that best represents your modeling area.

Example of the Classify Zones algorithms

The end result of using the Classify Materials Zones tool is that a new material set, based on the materials in your solids, will be added to your grid or mesh.

Try using the Classify Material Zones tool in GMS today!

Blog tags: 

Tips for Finding Information on the XMS Wiki

The Aquaveo XMS Wiki contains over 8000 pages of information and images about SMS, GMS, WMS, and other Aquaveo products (collectively called "XMS"). While we try to make the information as easy to find as possible, sometimes the sheer volume of available information can make a particular search term harder to locate. Here, we discuss a few ways to find the information you need using the XMS Wiki.

Help Button

Most dialogs in SMS, GMS, and WMS contain a Help button at the bottom of the dialog window. Clicking this button will generally take you directly to a page on the XMS Wiki about that dialog. This is the quickest way to find information about a dialog.

Navigation Links

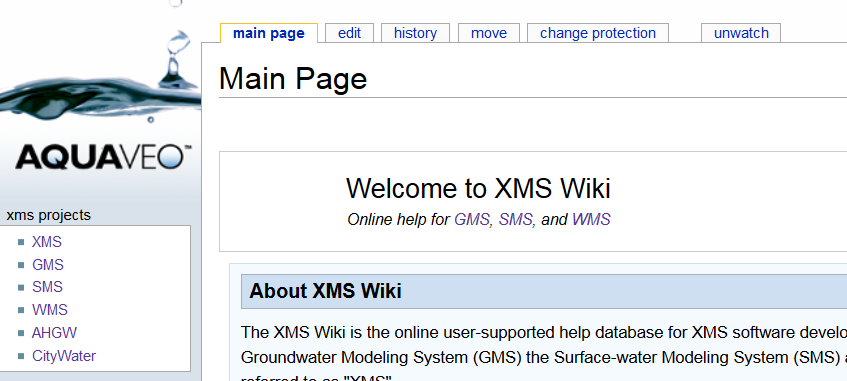
When you visit any page on the XMS Wiki, an "XMS Projects" menu is found at the top left of the page. Click on any of the products listed there to be taken to the main page for that product. Once there, click on any of the links in the Wiki Sections section on the lower right to be taken to a table of contents listing all of the pages discussing the features of that product.

Example of the XMS Wiki

At the bottom of the main page for the product, there is also a navigation template listing main topics for that product. This allows you to quickly navigate to any of those main topics.

Search Field
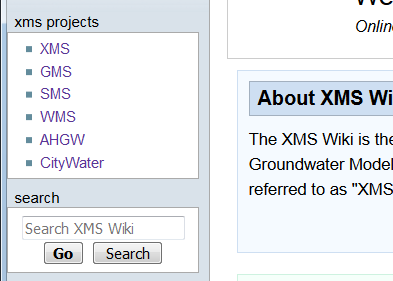
Example of the XMS Wiki Projects menu

Directly below the "XMS Projects" menu is a search field. If you start typing in that field, the XMS Wiki will attempt to locate a page containing what you type. To find a page about a particular product, preface the search term with that product's abbreviation, followed by a colon and the search term. For example, if you are searching for information about the bridge scour features in SMS, type "SMS:Bridge Scour" and a list of articles will appear below the search box. Simply select the desired article to be taken directly to it.

You can also enter only the search term and select the "containing…searchterm", where "searchterm" is the term you entered in the search box. This will bring up a list of pages containing the term you entered. This can be useful when you don't know what the page might be named, but you know a term that might be used on that page.

Categories

At the bottom of every page on the XMS Wiki is a list of one or more categories. This provides another way to locate information on a given topic. Simply click on the category to find a list of pages, images, and additional categories related to that topic.

Google

One option that is often overlooked is to use the power of the Google search engine. To search for pages or information on the XMS Wiki, enter "searchterm site:xmswiki.com", replacing "searchterm" with the word or words you are seeking. This tells Google to provide results only from the XMS Wiki. Click this link for an example.

Page Prefixes

Most pages on the XMS Wiki are prefaced by a product abbreviation. When reviewing search results, make sure the page you are on has the appropriate abbreviation at the beginning of the page title (e.g., "SMS:Display Options", "GMS:Display Options", "WMS:Display Options"), as similar pages may be found for various products.

Page Notices

Sometimes when searching for information or a feature, you may find pages that document obsolete or future features. These pages will have notices at the top indicating this status. There are other types of notices that may appear at the tops of pages, as well, so always be sure to read any notices that appear.

Try out these search methods today by visiting the XMS Wiki today!

Blog tags: 

Snapping Mesh Nodes to Arcs

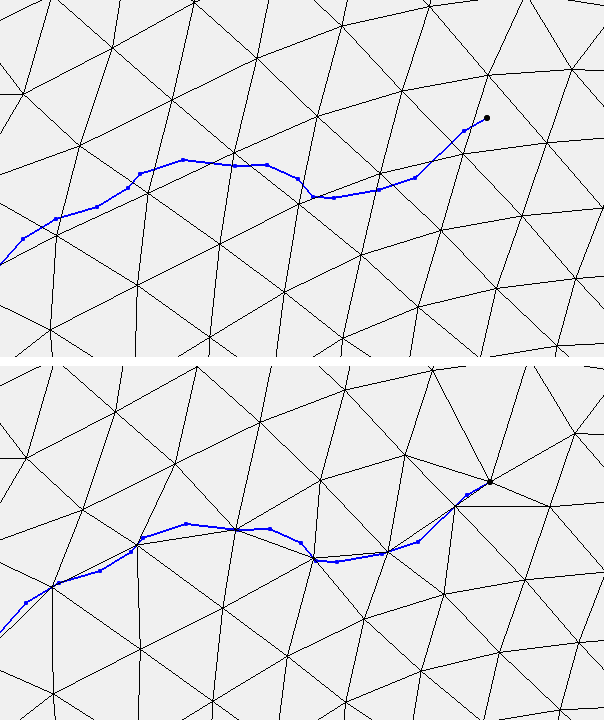
After generating a mesh, you might notice that not all of the nodes line up along key features. There are a few ways to resolve this, but SMS 13.0 introduces a new method: the Snap Mesh to Arcs command.

In order to use the Snap Mesh to Arcs command, you must have the following:

  • 2D Mesh
  • Map coverage

Once you have the needed components, snap the nodes to an arc by doing the following:

  1. On the map coverage, draw an arc or arcs where you want to move the mesh nodes.
  2. Select the desired arcs.
  3. Make certain the correct map coverage and mesh are active in the Project Explorer.
  4. Right-click on the map coverage in the Project Explorer and select Snap Mesh to Arcs.
  5. Specify a tolerance value in the Snap Mesh to Arcs dialog.
Example of snapping mesh nodes to arcs

The command aligns the nodes in the mesh to the selected arcs in the map coverage. If no arcs are selected, this command will move nodes for all arcs in the coverage, so be certain to either select the correct arcs or make certain there are no extra arcs on the coverage.

When using the tool, it will only work with the active mesh and the active map coverage. Be certain that the correct mesh and map coverage are active in the Project Explorer.

It should be noted that not all nodes will be snapped to the selected arc. Any node that could cause instability, if moved, in the mesh will not be moved. Furthermore, nodes outside of the tolerance value will not be moved. When the nodes have been moved they cannot be moved back, therefore it might be a good idea to first use the tool on a duplicate of the target mesh then, if the results are good, rerun the tool on the target mesh.

The Snap Mesh to Arcs tool can be a useful addition to your mesh editing tools. Try it out in SMS today!

Blog tags: 

Using Display Options with Multiple UGrids

Have you experienced setting display options for an unstructured grid only to see those settings not take? In GMS, each unstructured grid (UGrid) uses its own set of display options. A common reason for display settings not appearing is selecting the wrong UGrid when you have multiple UGrids.

Changing the UGrid display settings will only affect one UGrid at a time. So it is important to make certain the correct UGrid display options are being changed.

There are three ways to reach the Display Options dialog for UGrids:

  • Display Options macro
  • Display Options command in the Display menu
  • Display Options command in the UGrid Data right-click menu in the Project Explorer
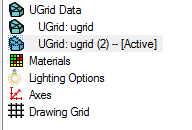
Display Options list showing multiple UGrids

Once in the Display Options dialog, check to see which UGrid is active. This is done by looking a the list on the left side of the dialog. The list on the left will indicate which By default, the display option will be set for the active UGrid. So one method to make certain you are setting display options for the correct UGrid, it to make certain that UGrid is the active UGrid in the Project Explorer before entering the Display Options dialog.

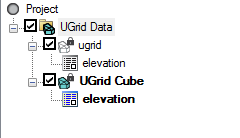
Multiple UGrids in the Project Explorer

The Display Options dialog can be used to change display settings for a UGrid that is not active. This is done by selecting the desired UGrid from the list on the left in the dialog. It should be noted that selecting a UGrid in th Display Options dialog does not cause the UGrid to become the active UGrid in GMS. So when you exit the Display Options dialog, you may need to change which UGrid is active in the Project Explorer to see the display setting changes.

It should be noted that which UGrid is active also matters when accessing the Dataset Contours Options dialog.

Hopefully, this helps clarify how to set display options in projects that have multiple UGrids. Make use of Ugrids disaply options in you project using GMS today!

Blog tags: 

Changing the Hydrograph Display in WMS

One of the more useful functions of WMS is displaying hydrographs. But did you know that WMS provide a multitude of ways to display each hydrograph?

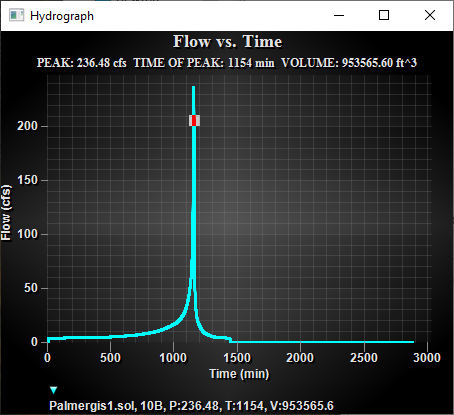
Using the hydrograph display options allows you to alter the display of each hydrograph to better show the hydrograph data. To customize the WMS hydrograph display, right-click on the open hydrograph and select Display Options. This brings up a dialog with options to change the display for that hydrograph.

Below is a summary of the items that can be customized on each of the Display Options tabs.

Hydrograph display example
  • The General tab allows changing items such as the hydrograph title and subtitle as well as the border style and viewing style. It also allows for changing the font size. The grid lines are also controlled here to let you decide the line precision and if the x and y lines will be shown.
  • The Plot tab contains a number of present plot options to adjust how the hydrograph data is shown. Some of the options include changing to a bar graph, only displaying points, using 3d display, or selecting different line graphs.
  • The Axis tab define how x and y axis are displayed. Specifically, the values range shown on these axis can be truncated or adjusted.
  • The Font tab controls the font used for the title, subtitle, points, axis, etc.
  • The Color tab allows changing the color of the plot labels and area. A number of preset color options are also included.
  • The Style tab changes the size, style, and color of the point and lines used in the hydrograph.

Once you have set the hydrograph displays to best show off the data, you can export your hydrograph. Hydrographs can be exported either by right-clicking on them and choosing Export/Print, or by choosing the Export button from within the Display Options dialog. Export formats include JPG, PNG, and text files. Hydrographs can be printed, copied to the clipboard, or saved to a file location.

Now that you have more tools for working with hydrographs, try them out in WMS today!

Blog tags: 

Using Constant Paving Density

Starting in SMS 13.0, there is a new paving option for 2D meshes.

Paving and other mesh types, such as patching, determine the shape and size of elements (cells) when generating 2D meshes. These options are set on polygons in the Map module using the 2D Mesh Polygon Properties dialog.

Using the correct mesh type can have a large impact on your project. A good mesh type will create the correct shape and size of the mesh elements that model the physical features accurately. Selecting the wrong mesh type can add needless complexity to your mesh and cause errors in the model run.

Previous mesh type methods included patch, paving, and scalar paving density.

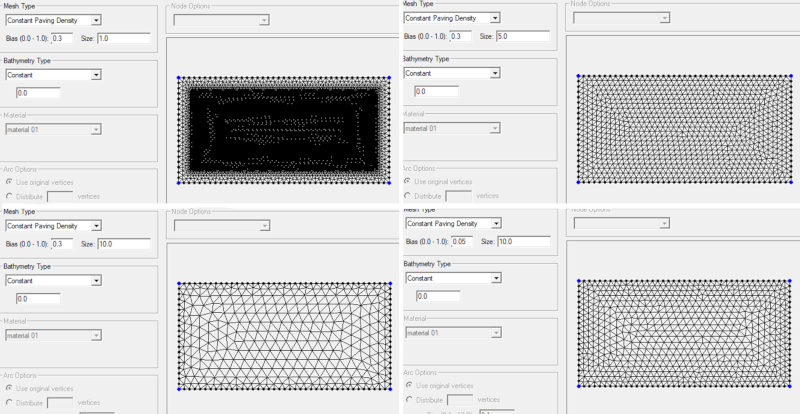
The pave meshing method fills a mesh polygon with equilateral, triangular elements. The new constant paving density uses the same approach as paving, but with an added component of a size and bias specified for each polygon. Size controls the target element size, while bias controls how quickly the elements transition to that size.

The following image shows the effects of changing the size and bias for a 100 x 200 rectangular mesh, with arc spacing of 5.

It should be noted that the above are merely examples to demonstrate the effect of changes in the size and bias values. For smooth transition of element size, it is recommended that the bias value be less than 0.3. Having element sizes that change too quickly can significantly impact the model run results.

As always, it is a good idea to perform a mesh quality check on the final mesh before including the mesh in your model. If problems are found in the mesh, adjust your size and bias setting then regenerate the mesh.

With the options available for mesh types, these tools should give you what you need to make the perfect mesh for your projects. Try the constant paving density option in SMS today!

Blog tags: 

Converting a 3D Dataset to a 2D Dataset

It sometimes happen where you have a fully developed 3D model in GMS and need to transfer a dataset from the 3D model to a 2D model. GMS provides a way to convert a dataset on a 3D grid to a 2D grid. From there the dataset can be exported as 2D data for use in a 2D model.

To acquire a 2D dataset from a 3D dataset, you need the following:

  • 3D grid
  • 2D grid
  • 3D dataset

To convert a 3D dataset to a 2D dataset, do the following:

  1. In the Project Explorer, select a dataset under a 3D Grid.
  2. Use the Grid menu to select the 3D Data → 2D Data command.
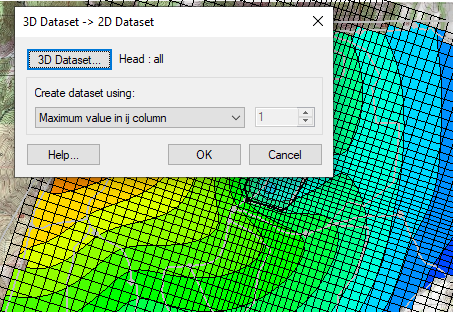
  3. Select option in the 3D Dataset → 2D Dataset dialog.
3D dataset to 2D dataset

The 3D Dataset → 2D Dataset dialog allows choosing which dataset to converted. By default, the dialog will use whichever 3D dataset is active in the Project Explorer. If another dataset is desired, from a MODFLOW simulation for example, you can make the change in the dialog..

The dialog also allows creating the new 2D dataset using one of the following parameters:

  • Maximum value in ij column
  • Minimum value in ij column
  • Average value in ij column
  • Sum of values in ij column
  • Highest active value in ij column
  • Value from k layer

K represents the layer number with 1 being the surface layer, and J and I representing the x and y locations of a cell (or column of cells) in the grid.

Keep in mind that one of the grids could be covering the other so if you want to observe specific data, you may need to turn off other data.

Additional additional information about converting 3D grids to other data can be found on our wiki.

Try out converting 3D datasets to 2D datasets in GMS today!

Blog tags: 

Common Installation Issues with XMS

Are you having trouble installing GMS, SMS, or WMS? Here are three common installation issues, and how to overcome them.

Virtual Machines

The main issues when using virtual machines is selecting the correct type of installation. Single-user locks are not compatible with virtual environments. If you are trying to install XMS with a single-user lock and a virtual machine is detected, XMS will not install. You will need a network lock to get around this issue. Network locks are designed to be used with virtual machines. Single-user locks are not capable of being used as a network lock.

Firewalls and User Permissions

Sometimes, a good password will fail to install XMS, This is because your computer actually needs to contact our servers to verify the authenticity of the password. When an internet error comes up, it's typically related to a firewall, user permissions, or antivirus software blocking the connection to our servers.

Try one of these solutions to resolve this issue:

  • Whitelist which ever XMS program you are trying to install and the registration wizard.
  • Temporarily disable the firewall/antivirus software.

Note that firewalls are typically something each company's IT department handles.

If you are running Windows 8 or 10, and you are not running in a virtual environment, then the issue could be caused by a Windows feature called Hyper-V. Disabling Hyper-V can resolve the problem. You can find instructions on how to disable Hyper-V by reading this article.

Hardware locks

When installing a hardware lock, be sure to have your drivers installed and running before attempting to register the lock. Additionally, please also ensure that the lock is plugged into the computer at the time you are attempting to register. (Note that as a security measure, the reburn cannot take place remotely.) For instructions on how to install your specific type of hardware lock please visit our page here.

Feel free to contact our technical support team at support@aquaveo.com for more individual help in troubleshooting any of these problems. Please recognize that Aquaveo technical support can only help troubleshoot individual machine issues to a certain point.

Blog tags: 

Pages