XMS

Aquaveo 2023

It's been a good year here at Aquaveo and a lot has happened that we're proud of, so we’d like to close out the year by reviewing some of our biggest highlights. We released new versions of our software, including new tools and features. We released SMS (Surface-water Modeling System) 13.3, WMS (Watershed Modeling System) 11.2, and GMS (Groundwater Modeling System) 10.8 beta.
Aquaveo 2023

Significant upgrades were made to the color ramp in the contour section of the display options. Many new pre-generated contour color and customization options were added to help you get your project looking just right. But for those of you who prefer to stick with what you know best, the old color ramp options remain available to you through the Legacy options button.

We're excited about what we've got going on in our toolboxes. The toolbox option has made it to WMS with version 11.2, and there are new tools in the toolboxes for GMS and SMS. SMS has tools for backing up meshes and restoring previous meshes., Both GMS and SMS have new tools for generating unstructured grids. This is just a sample of what has changed in the toolboxes. Take a look for yourself to see all the different tool options that have come with the newest versions of our software.

SMS 13.3 has new 3D structure modeling capabilities, which you can learn about on our wiki or use our new 3D Structures tutorials for a more hands-on learning experience. We've also added four new models in SMS 13.3's free community edition: ADCIRC, AdH, CMS-Flow, and STWAVE.

We partnered with Aquanty to bring the HydroGeoSphere model to GMS 10.8 beta. The HydroGeoSphere model can help you more accurately replicate the complex processes involved in the terrestrial part of the hydrological cycle.

WMS 11.2 now includes the WinTR-20 model in the TR-20 interface. WinTR-20 is an updated version of the TR-20 model used in both the WinTR-20 and TR-55 programs. You can learn about what this entails on our wiki, or by using our new tutorial on the WinTR-20 interface.

For Arc Hydro Groundwater (AHGW), we released a version that is compatible with ESRI's ArcGIS Pro. AHGW Pro contains significant updates to the arc hydro groundwater tools and makes use of ArcGIS Pro’s online platform.

We continue to develop our Tethys products, including CityWater. We were pleased to have released the Automated GSSHA Watershed Analysis (AGWA) , an online web application for managing watershed models.

We are also excited about our work with GEOGloWS and our other development partners. We are looking forward to our continued collaboration.

As excited as we are about what happened this past year, we’re even more excited about what 2024 will bring. We can tell you that there will be even more new tools in the Toolbox. We expect to release the full version of GMS 10.8 early in 2024. Also expect more new features for all of your favorite water modeling applications.

You've helped make this year a great one, and we hope you'll come along with us and do the same in 2024!
Blog tags: 

Contours from Raster and Features from Raster

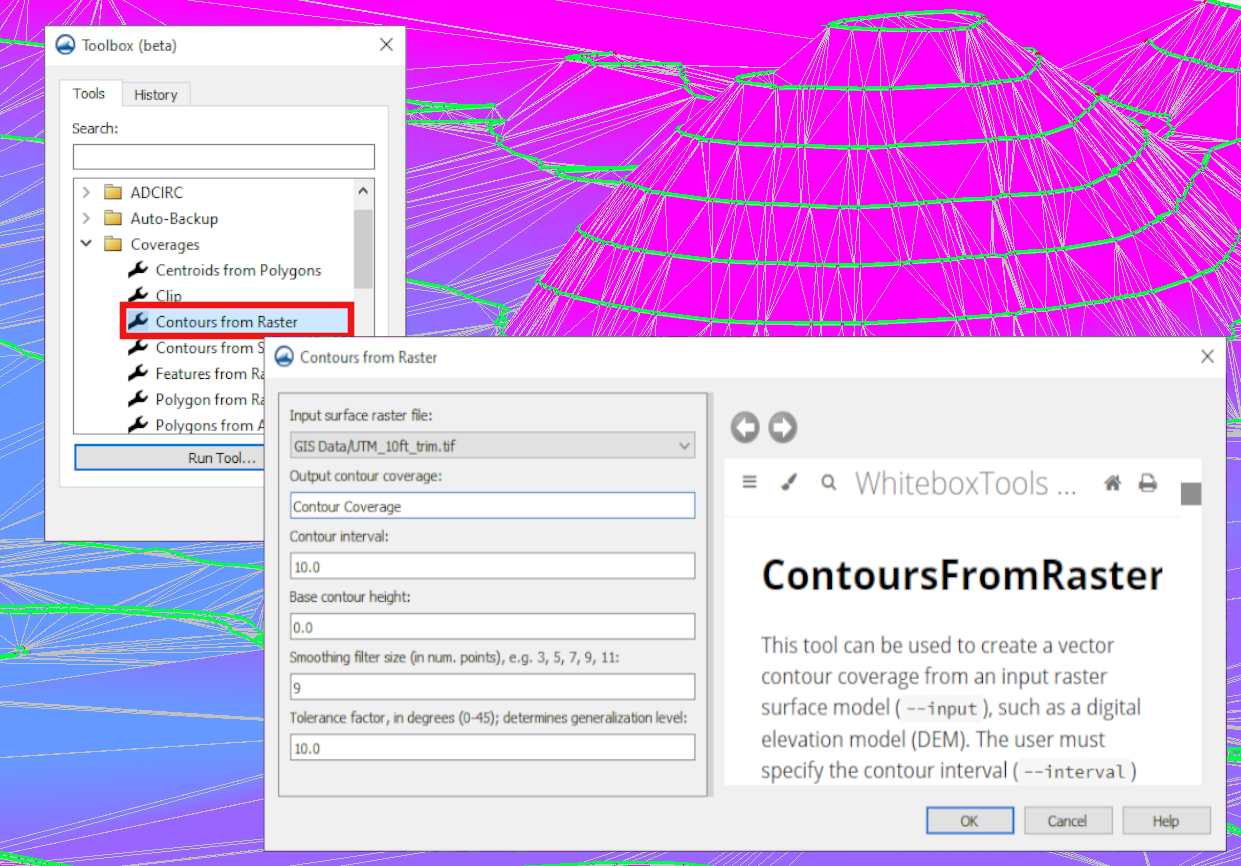
Two new tools in the most recent version of theToolbox for Aquaveo’s GMS, SMS, and WMS (collectively known as XMS) are the Contours from Raster and the Features from Raster tools, which can be found in the “Coverages” folder of the toolbox. These tools can be a great way to use rasters to quickly generate coverages with contours or specific features such as streams and roadway embankments.

The Contours from Raster tool takes the elevation data from a raster and uses it to generate a contour coverage. This generates contours lines along the elevations at specified intervals. This can be useful for a number of things including, in some cases, a simple way to see where to define domains and boundaries for your project.

Contours generated from raster data

To generate this contour coverage using the Contours from Raster tool, you’ll need these components:

  • A surface raster file loaded into the project.
  • A contour interval you want for your project.
  • Base contour height appropriate for your project.
  • Smoothing filter size (in num. points), which should be an odd number.
  • Tolerance factor between 0 and 45 degrees. This determines the generalization level.

The Features from Raster tool generates features like streams and roadway embankments based on the elevation data from a raster. This tool can minimize the need to draw these features by hand. The inputs required for this tool are:

  • An input elevation raster loaded into the project.
  • The feature type which can be either stream or ridge.
  • The threshold area.
  • The pre-processing engine appropriate for your project:
    • rho8 – Computes flow directions and accumulations using the Rho8 algorithm.
    • Whitebox full workflow – Computes flow directions and accumulations using the Whitebox tool full workflow algorithm that uses a standard D8 method for computing flow directions.

Rasters often contain a large number of data points, so it may be beneficial to use the Smooth Raster tool or Feature Preserving Smoothing tool on the raster before using it to create contours or features. Alternatively, the Clean command can be useful for tidying up feature objects after the coverage has been generated.

Go to any of the XMS software to try out these new tools as a way to create coverages for your project today!

Blog tags: 

Changing Ports for Aquaveo Licenses

Sometimes it may be beneficial to change the license location for one or more of our XMS (GMS, SMS, and WMS) software on your computer. There are a number of reasons to do this, including to increase security and flexibility. The port number has to be changed in two locations for the port to be switched over properly.

First, open the Aquaveo License Registration dialog. This dialog comes up when you first download the software so you can enter the licensing information. If you've already done this, the dialog can also be accessed by selecting Register… under the Help menu. After opening Aquaveo License Registration, do this to change the port number:

  1. Select the Advanced Options… button.
  2. At the top of the dialog, click the Change Location… button.

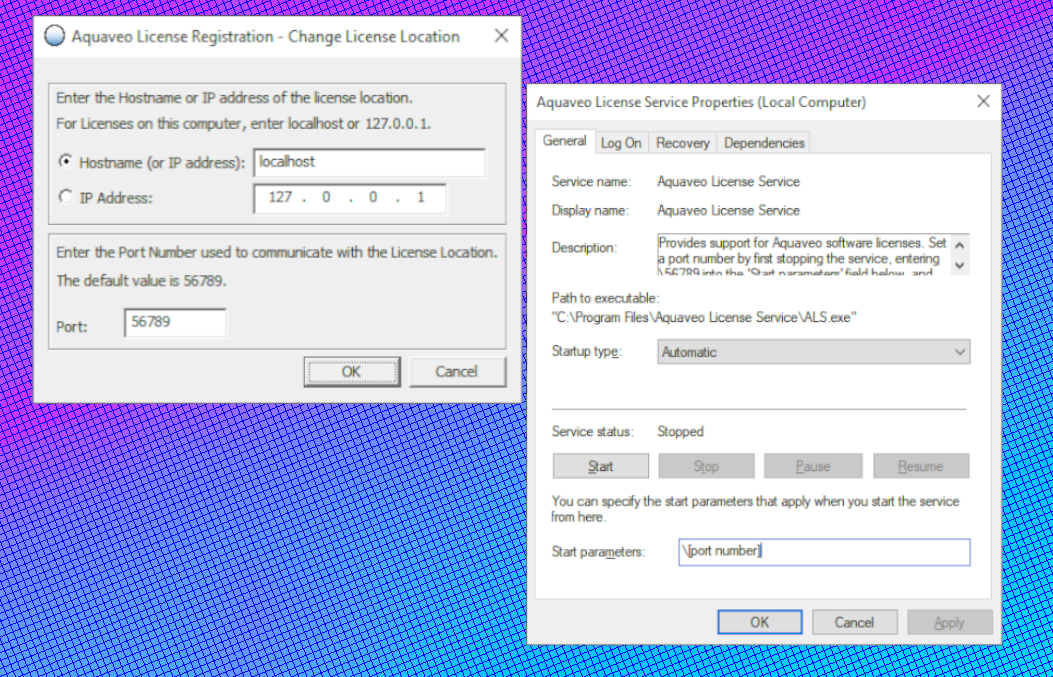
A dialog labeled Aquaveo License Registration – Change License Location will open. This dialog shows the IP address that is currently being used, as well as the current port number. This is where you can change the port number.

Changing XMS Port License

The other location the port number needs to be changed In order to switch over properly is the Aquaveo License Service Properties. Follow these instructions to open ALS Properties:

  1. Open the Services app. This can be found by typing "services" into the search on your taskbar.
  2. In the list of services, find "Aquaveo License Service" and select Properties.
  3. On the General tab at the bottom click Stop.
  4. In the Start Parameters, type the new port number with a backslash (\) in front of it.
  5. When you are finished, click Start.

The port location change won’t be complete until the port number is changed in both the Aquaveo License Registration and the Aquaveo License Service Properties.

Open any of the XMS software and check out how you can change the license location today! If you have more questions about licensing, contact our Licensing Support by emailing licensing@aquaveo.com.

Blog tags: 

Tips for Locating the Correct Projection

It is crucial that data brought into GMS, SMS, or WMS contain the correct coordinate system. The coordinate systems are designated through the use of projections. But what do you do if you import data and it doesn’t have the correct projection information or is missing projection information all together?

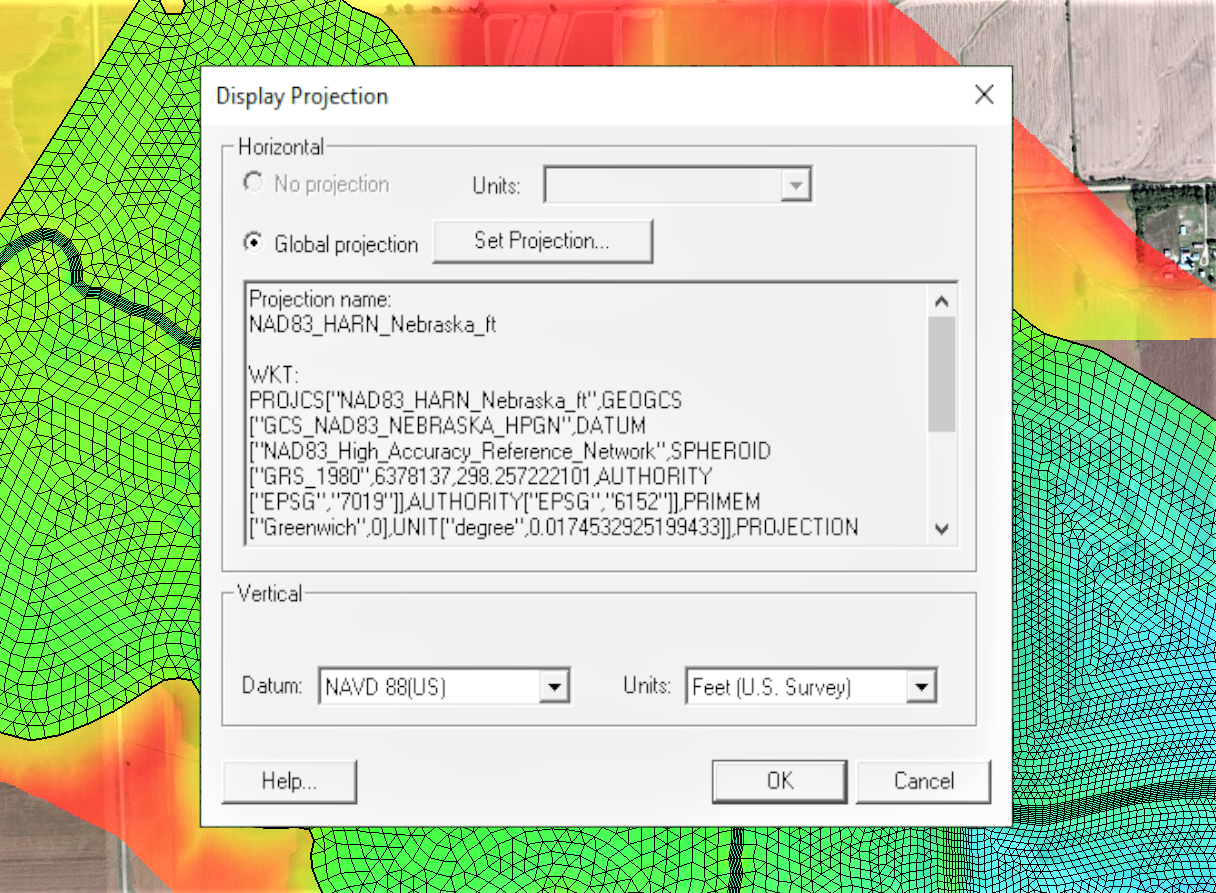
Example of The Display Projections dialog

If you know what projection the data is supposed to be set to, use either the Display Projection dialog to set the projection for the project or right-click on the data in the Project Explorer to set the object projection. It is recommended that all data in a project use the same projection. To set the projection using the Projection dialog, do the following:

  1. Go to the Display menu at the top of the window and select Display Projection. This will bring up the Display Projection dialog.
  2. Under the Horizontal section, if “No projection” is selected, change it to “Global projection”. If “Global projection” is already selected and you want to change the projection, select the Set Projection… button.
  3. /From the dialog that opens, you can search through the provided database for the correct projection, or you can import a projection (*.prj) file from outside the application.

More information about the Display Projection dialog can be found here [2]. The object projection is set through the Project Explorer right-click menus, but otherwise follows a similar workflow.

If you already have data imported into the project that has the correct projection, see if you can reproject the data with the incorrect or missing projection. In general, you can reproject the data by right-clicking on a specific data object in the Project Explorer. With SMS, you can also go to the Display menu at the top of the window and select Reproject All… to reproject the data all at once.

If you don’t have a projection, use the Online Maps tool to locate the correct area in the world, then download the data using Online Maps to obtain coordinate data. Set your data to use this projection. Make certain the data lines up correctly with the downloaded data.

Rarely, the project information is included in the data but XMS fails to read the projection. This is often the result of a formatting issue. Try opening the file in a text editor to see what projection information is there. Then either adjust the formatting so XMS can read the projection information, or set the projection for the data after importing.

Head over to any of the XMS products and see how projections work today!

Blog tags: 

Pages