We use cookies to make your experience better. To comply with the new e-Privacy directive, we need to ask for your consent to set the cookies. Learn more.

Obtaining DEM and TIN Data in WMS
For many watershed modeling projects, having the correct DEM or TIN can make a huge difference. Importing a DEM or TIN into WMS can be done in any of a few ways.
The easiest way to obtain a DEM or TIN is to import a file from your computer directly into your project. This can be done using any of the methods for opening a file: the Open command, drag-and-drop, etc.
Once your DEM or TIN file is in WMS, check to make certain it is in the correct module. In order for WMS to make use of DEM or TIN, it often needs to be in the Terrain Data module. Sometimes, a DEM or TIN will be imported as a raster file or scatter set. In order to fix this, the DEM or TIN needs to be converted.
- When imported as a raster file, right-click on the raster file in the Project Explorer and select Convert To | DEM. Then select the resample size for the DEM.
- When imported as a scatter set, right-click on the scatter set in the Project Explorer and select Convert | Scatter Points to TIN.
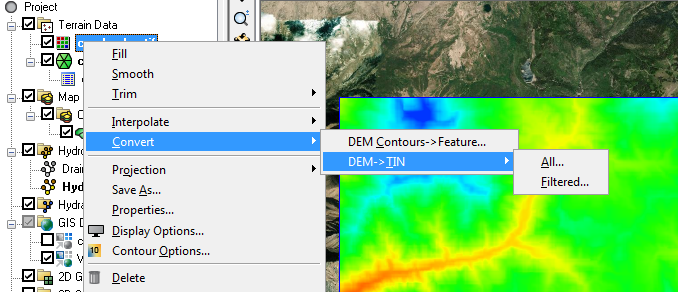
Once the data has been moved to the Terrain Data module, it can be moved from a TIN to DEM or a DEM to TIN as needed. This is done by right-clicking on the DEM or TIN and using the Convert commands.
Knowing how to convert data to be either a DEM or TIN in the Terrain Data module allows you to make use of the Import from Web and Online Maps functions in WMS to obtain DEMs and TINs. Other data sources can be used, when available.
A DEM can also be obtained when using the Hydrologic Modeling Wizard. In the Download Data step, elevation data can be downloaded that will automatically be placed in the Terrain Data module as a DEM.
Make use of DEMs and TINs in your watershed modeling using WMS today!
April 1, 2020
|
View: 583
|
Categories: WMS
|
By: <a class="mp-info" href="https://aquaveo.com/blog/author/admin">Aquaveo Staff</a>
About the Author

Performing a Silent Install of XMS (Passwords & Hardware Locks)
October 10, 2018
Tips for Finding Information on the XMS Wiki
September 25, 2019
Aquaveo 2024 in Review
December 30, 2024
How to Fix MODFLOW General Head Boundary Errors Using GMS
February 18, 2025
Help with Flow Direction and Accumulation
December 17, 2024
Connecting UGrid Points with Arcs
May 6, 2025
Simplifying Nested Grids with the Spectral Coverage
April 29, 2025
Converting Solids to Scatter Sets in GMS
April 22, 2025
Simplifying Watershed Modeling with Rho8 Tools
April 15, 2025
Enhanced Structure Options for CMS-Flow
April 8, 2025