We use cookies to make your experience better. To comply with the new e-Privacy directive, we need to ask for your consent to set the cookies. Learn more.

Converting Mesh Data to a Raster
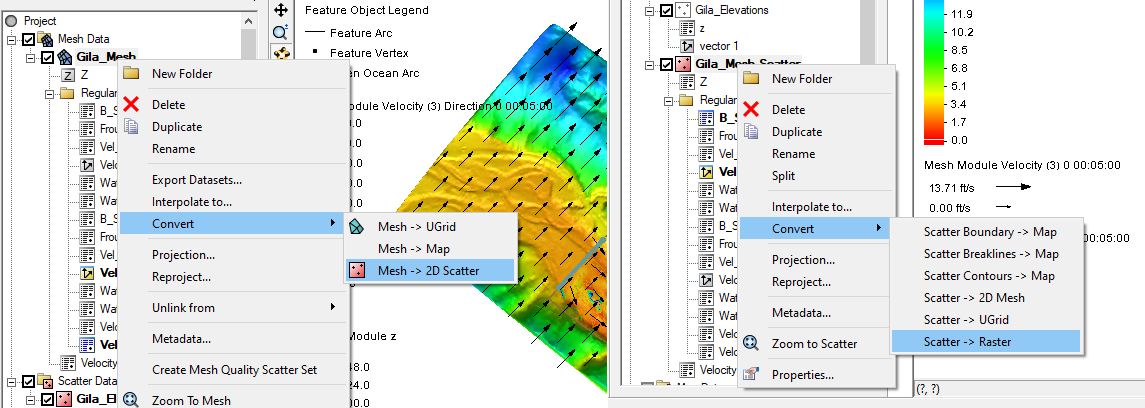
After creating a mesh in SMS, you may want to share the data in the mesh as a raster file. For example, you might want to convert the water elevation or velocity dataset from a model run into a raster. Raster files can be opened by many programs and can contain a lot of useful information.
While a raster cannot be created directly from the Mesh module, it can be created from other modules, so the mesh data will need to be converted. To do this:
- In the Project Explorer, select the mesh you want to convert to a raster.
- Right-click and select Convert | Mesh to 2D Scatter.
- In the Convert Mesh to Scatter Points dialog, use the Convert only corner nodes option and give the scatter set a name.
After the mesh has been converted to a scatter set, a couple more things have to be done. The datasets, except for the elevation set, will need to then be interpolated over to the scatter set.
- In the Project Explorer, right-click on the mesh and select Interpolate to command.
- In the Interpolation Options dialog, select the datasets to interpolate over to the scatter set generated from the Mesh.
Once the mesh and datasets have been converted to the Scatter module, they can be converted to a raster by doing the following:
- Select the dataset and time step to be converted.
- In the Project Explorer, right-click and select Convert | Scatter to Raster.
- Select raster options in the Interpolate Scatter to Raster dialog.
- Give the raster a file name and save it as a GeoTIFF.
When going through this process, the active dataset and the active time step at the time of the conversion will be the information saved to the GeoTIFF file.
Feel free to try out the above process of converting a mesh dataset to a raster file in SMS today!
April 15, 2020
|
View: 2360
|
Categories: SMS
|
By: <a class="mp-info" href="https://aquaveo.com/blog/author/admin">Aquaveo Staff</a>
About the Author

Performing a Silent Install of XMS (Passwords & Hardware Locks)
October 10, 2018
Computing Basin Curve Numbers in 9 Easy Steps
May 16, 2023
Converting a NET File to an INP File
May 9, 2018
Performing a Silent Install for ALS
October 27, 2021
Tips for Finding Information on the XMS Wiki
September 25, 2019
Essential DEM Clean-Up for Watershed Delineation
March 24, 2026
Essential Boundary Condition Guide
March 17, 2026
How to Delineate a Well Capture Zone Using MODPATH
March 10, 2026
How to Decide between Structured or Unstructured Grids
March 3, 2026
Storing Time Series Data Using the Spatial Data Coverage
February 24, 2026