We use cookies to make your experience better. To comply with the new e-Privacy directive, we need to ask for your consent to set the cookies. Learn more.

How to Import and Use NOAA Tide and Water Data
Coastal modeling requires good data. Fortunately, resources like the National Oceanic and Atmospheric Administration (NOAA) publicly provide their live and historical data of tidal and water level information from all over the US. The Surface-water Modeling System (SMS) makes it possible to add data from NOAA directly into your ADCIRC or other models. This improves your models by using real-world data for local averages as well as anomalous events like storms.
In this post, we will walk through how to import NOAA tide and water level data into your SMS projects.
Step 1: Access NOAA Tide and Water Level Data
NOAA records real-time data from all over the United States. This data along with historical records are maintained by its Center for Operational Oceanographic Products and Services (CO-OPS). Real-time and historical data can be downloaded from their website and are categorized by the type of data:
-
Tides and Water Levels – water levels, harmonic constituents, and datums
-
Sea Level and Coastal Flooding – inundation and flooding data
-
Meteorological Observations – wind speed and direction
-
Station Information – physical location the data was collected
These can generally be downloaded from the NOAA website with varying time intervals and data types, so make sure to set all information to consistent units, time zones, and data for your simulations.
Step 2: Format Data for SMS
Once downloaded the data needs to be prepared for use as a boundary condition for your simulation. SMS time series data needs to be formatted as a *.txt or *.csv file type. For your own sanity, keep the title line in your data. This can be omitted in SMS from the data imported but is useful for ensuring you assign your data columns correctly when importing the numbers to SMS. Once again, ensure all time stamps are time zones, datum, and units are consistent with your calculations.
Step 3: Import Data into SMS
Now you are ready to put your data somewhere useful! Follow these instructions carefully to ensure a seamless transition to SMS:
-
Open SMS
-
In the Menu Bar, select File | Open… and navigate to your data file and click Open
-
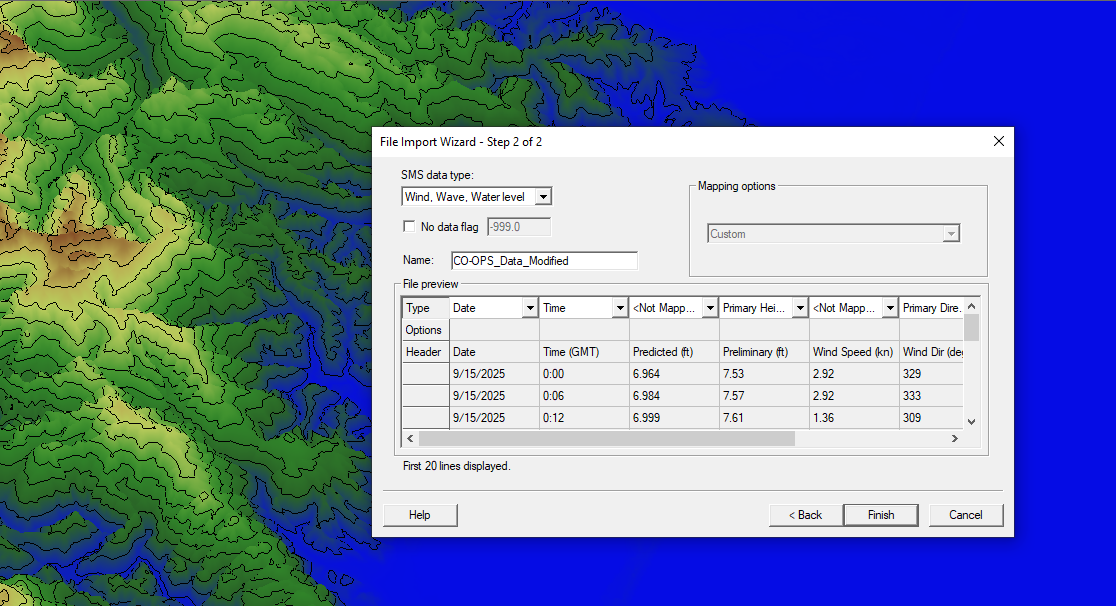
The File Import Wizard may appear to help you correctly import your file
You can also drag and drop your *.txt or *.csv file into the SMS window as a quick alternative. Both will prompt you to assign your datasets and your data will be imported into SMS!
Step 4: Use Data in Simulations
With your data safely nestled in the Project Explorer, it is time to use it! The data can be added as a boundary condition with a boundary condition coverage for your simulation of choice. Once the geometry is created for the boundary condition, assign the data to the coverage and add the coverage to your simulation. Finish up the other information you want to include in the simulation and you are ready to run it!
Conclusion
Now you are armed with a new tool in your toolbox: NOAA data for SMS! With NOAA tidal and meteorological data you should be able to develop models with more accuracy and use measured data to validate your predictions. Download SMS today and give importing NOAA data a try!
October 21, 2025
|
View: 3318
|
Categories: SMS
|
By: <a class="mp-info" href="https://aquaveo.com/blog/author/admin">Aquaveo Staff</a>
About the Author

Performing a Silent Install of XMS (Passwords & Hardware Locks)
October 10, 2018
Converting a NET File to an INP File
May 9, 2018
Computing Basin Curve Numbers in 9 Easy Steps
May 16, 2023
Performing a Silent Install for ALS
October 27, 2021
Tips for Finding Information on the XMS Wiki
September 25, 2019
Troubleshooting Projection and Coordinate System Issues
June 23, 2026
How to Determine Soil Texture Using NRCS Soil Data
June 16, 2026
Diagnosing Costly Model Stability Issues
June 9, 2026
New Display Enhancements in GMS 10.9
June 2, 2026
SMS 13.5 Beta Out Now!
May 26, 2026