We use cookies to make your experience better. To comply with the new e-Privacy directive, we need to ask for your consent to set the cookies. Learn more.

Viewing an Aquifer's Water Level
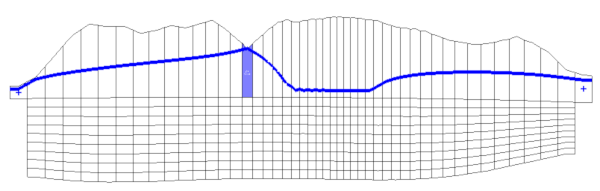
After completing a MODFLOW groundwater model in GMS, have you needed to see the aquifer water level? Viewing the water level can aid in visualizing the saturated thickness of an aquifer. The water level can be viewed by doing the following:
- Ensure that the Ortho Mode option is toggled on.
- Go to Display | Display Options, choose 3D Grid Data, and go to the MODFLOW tab.
- Toggle on the Water Table option, and click OK.
- Choose either the Front View or the Side View option, or select a cross section to view the water table level.
Additional information about the MODFLOW display options, including the Water Table option, can be found on our wiki.
After viewing the water table, it is possible to save the spatial 2D data for the saturated thickness (water table thickness from the aquifer base).
There isn't a shortcut way to save the 2D water table thickness. However, the desired dataset can be created by converting the head and bottom elevation datasets to 2D datasets, and using the dataset calculator to create a dataset of the difference between the two datasets. The workflow is outlined below.
- Right-click on your 3D grid and select Convert To | 2D grid.
- Select your Head 3D dataset.
- Go to the Grid menu, and select 3D data → 2D data.
- Choose the desired option in the Create dataset using dialog box selecting the option that best fits your desired dataset.
- Repeat steps 2–3 for the Bottom MODFLOW dataset.
- Select the 2D grid and go to Edit | Dataset Calculator.
- Create the expression: head dataset minus bottom dataset.
- Note: If you would like to create a dataset of all time steps, check the box next to Use all time steps before computing.
- Give the new dataset a name in the Result option, and click Compute.
- Your new dataset will appear under the 2D grid.
Now that you know how to view and save a water table, try it out in GMS today!
December 4, 2019
|
View: 2899
|
Categories: GMS
|
By: <a class="mp-info" href="https://aquaveo.com/blog/author/admin">Aquaveo Staff</a>
About the Author

Performing a Silent Install of XMS (Passwords & Hardware Locks)
October 10, 2018
Computing Basin Curve Numbers in 9 Easy Steps
May 16, 2023
Converting a NET File to an INP File
May 9, 2018
Performing a Silent Install for ALS
October 27, 2021
Tips for Finding Information on the XMS Wiki
September 25, 2019
Best Practices for Modeling Complex Geometries
April 28, 2026
Managing MODFLOW 6 Data: Lists, Copy Period & CSVs
April 21, 2026
5 Concepts for Mastering Surface-water Modeling
April 14, 2026
Comparing Multiple Design Alternatives in One Project
April 7, 2026
Incorporating MODFLOW 6 Groundwater Energy (GWE)
March 31, 2026