SMS

Selecting the Right MODFLOW Solver Package

Have you wondered which MODFLOW solver to use for your MODFLOW project in the Groundwater Modeling System (GMS)? When creating a groundwater model in GMS using MODFLOW, the selection of the solver package is an important decision that will affect the accuracy, speed, and efficiency of your model. This post will cover different complexities to consider while using GMS for your project.

Example of MODFLOW Solvers available in GMS

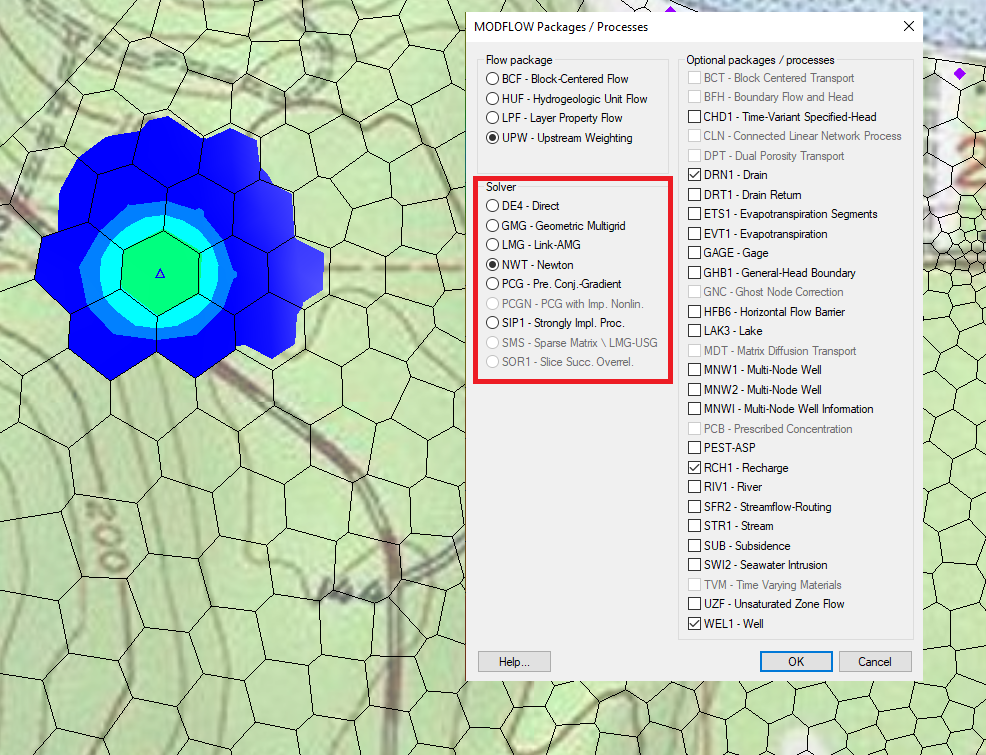
MODFLOW offers different solver packages, and the appropriate selection depends on the specific characteristics of your model. Here are some tips and ideas on how to select a solver package for your MODFLOW project in GMS:

  • Consider the size and complexity of your model. Some solver packages are more suitable for large and complex models, while others are better for smaller and simpler models.
  • Look at the type of boundary conditions you are using. Some solver packages are more appropriate for models with sharp contrasts in hydraulic conductivity, while others are better for models with more gradual changes.
  • Consider the amount of memory available on your computer. Some solver packages require more memory than others, and this can affect the size of the model you can simulate.
  • Look at the speed of the solver. Some solver packages are faster than others, but this may come at the expense of accuracy.
  • Consider the level of expertise you have with the solver package. Some solver packages are more user-friendly than others, and require less knowledge to set up and run.

Here are some general pros and cons of the available solver packages in MODFLOW:

  • PCG - this is the most commonly used solver package in MODFLOW. It is versatile and can handle a wide range of models. It is efficient for small to medium-sized models. However, it can be slow and memory-intensive for larger models.
  • GMG - this solver package is suitable for models with irregular grids and can handle models with steep gradients in hydraulic conductivity. It is efficient and requires less memory than PCG. However, it can be slower than PCG for models with smoother gradients.
  • LMG - this solver package is designed for large-scale models with highly heterogeneous geology. It is efficient and can handle models with multiple stress periods. However, it requires more memory than PCG and can be slower for smaller models.
  • NWT - this solver package is suitable for models with nonlinearities and can handle models with large gradients in hydraulic conductivity. It is efficient and requires less memory than PCG. However, it may be less accurate than PCG for models with sharp contrasts in hydraulic conductivity.

In summary, selecting the appropriate solver package for your groundwater model in MODFLOW requires careful consideration of the size, complexity, and boundary conditions of your model, as well as the amount of memory available on your computer, the speed of the solver, and your level of expertise with the solver package. Using GMS makes it easier to see which MODFLOW solver is best suited for your project. GMS also prevents selecting MODFLOW solvers that are incompatible with the selected version of MODFLOW.

Try out using the different MODFLOW solvers in GMS today!

Blog tags: 

Troubleshooting an SRH-2D Model

Do you have an SRH-2D model that is failing to converge or has other errors? It is important to understand that errors in SRH-2D model runs are not uncommon and not necessarily an indication of a major problem. This post will give you some guidance so you can quickly identify and fix errors. This will allow you to produce accurate and useful results.

Common errors often appear around items that were missed during the model development. To avoid errors, it is important to review all data that’s been important into SMS. Also, care should be taken in designing and generating the mesh or grid being used in the simulation. While SRH-2D is rather forgiving, sometimes small issues in the mesh or grid can cause errors. Finally, double-check all boundary conditions that they are in the correct location and that all model parameters have been set.

It's important to note that while the SMS model checker can identify some errors, it does not validate the data and cannot catch all errors. Therefore, it is important to be familiar with the SRH-2D error codes and how to troubleshoot them.

Example of error found in an SRH-2D project

When encountering an error, it is important to remain calm and follow the steps outlined in the blog post, recording the error number and referring to the SRH-2D error page for guidance. Often, solutions involve minor adjustments to data inputs or boundary conditions.

If you were unable to record the error from the model wrapper, don't worry. You can still see this information by reviewing two of the files generated by SRH-2D during every model run. These files will be named [projectname].OUT.dat and [projectname].DIA.dat files.

To use these files:

  1. Locate the files in the model run directory with your project file.
  2. Open the *.OUT.dat or *.DIA.dat files using a text editor such as Notepad.
  3. Look through the text file to locate the error code.
  4. Go to the SRH-2D error page to find the solution.
  5. Make the needed change(s) to your project and run SRH-2D again.

By mastering the process of troubleshooting SRH-2D errors, you can produce accurate and useful results that can inform important decisions related to water resources and hydraulic engineering. The Community Edition of SMS is a great resource for exploring the capabilities of SRH-2D in SMS. Use SRH-2D with SMS today!

A previous version of this article was publish in 2018

Blog tags: 

Fixing Negative Water Depth

If you've worked with an SRH-2D model in the Surface-water Modeling System (SMS), you may have noticed that there will be times that some nodes appear to have a negative water depth. This can be problematic because it often doesn't reflect the true nature of the body of water. SRH-2D simulations default their calculations to be cell-centered, while meshes calculate data from the nodes. Inactive cells are set to have a null value of -999, but if you're working with meshes, the nodes that touch the inactive cells will interpolate with the value of -999, thus causing a negative water depth to generate on that node. If this is something you want to avoid, here are some ways to eliminate a negative water depth.

Example of negative depths in an SRH-2D project

The first way to eliminate these negative water depth values from your SRH model when working with a mesh is to run your simulation as normal, and then use the Data Calculator in the Data Set Toolbox to truncate the data to a more desirable number, often this number will be zero. Follow these steps to truncate the data:

  1. Open the Data Set Toolbox under the Data menu.
  2. Under the Math section, select the Data Calculator.
  3. Find the dataset you are wanting to truncate, which will be labeled with "d#".
  4. Enter the following formula into the Calculator: "trunc(x,a,b)" where x is the dataset to be truncated, and where all the data will be greater than or equal to a, and less than or equal to b.
  5. Change the Output dataset name to one that suits your project.
  6. Click Compute, then close the Data Set Toolbox.

Make the new truncated dataset active in the Project Explorer, and note that the new minimum water depth is zero.

Example of truncated values in an SRH-2D project

Another way to get rid of negative water depths is to use an unstructured grid (UGrid). Ugrids use the same cell centered calculations that SRH-2D does, so you won't run into the same issues with how the data is interpolated. If you have already created your simulation on a mesh, you can follow these steps to convert to a UGrid:

  1. In the Project Explorer, right-click the desired mesh and select Convert | Mesh → Ugrid.
  2. If desired, change the Output grid name to something that suits your project.
  3. Remove the mesh from the simulation by right-clicking on the mesh name under the SRH-2D Simulations folder and selecting Remove.
  4. Drag the newly converted UGrid under Sim in the SRH-2D Simulations folder.
  5. Run the simulation again.

SRH has now recalculated the data with the UGrid with only cell-centered interpolation, which should remove any unintended negative water depth calculations.

Go to SMS and try out these ways to eliminate negative water depth today!

Blog tags: 

Filling Missing Raster Data

Do you have a raster that has holes in it? The Fill Nodata can fix small holes in raster data. Available in GMS, SMS, and WMS. In this article, we will explore the ways that the Fill Nodata tool can be used in WMS.

The Fill Nodata tool fills in small areas or gaps in a raster where no elevation data exists. It is located in the Rasters/Fill Nodata section of the Toolbox. The tool will interpolate an elevation to raster cells that are classified as "NODATA". Then the tool will create a new raster in the project that has the fillable no data areas filled.

Example of the File Nodata tool

These holes in the raster can occur for a number of reasons, one of the most common being that the data is incomplete. WMS is flexible enough that it can use a raster with small amounts of missing data for most simulations. However, it is recommended that you have data that is as complete as possible to ensure the generated model is as accurate. Therefore using the Fill Nodata tool can help ensure the accuracy of your model.

The Fill Nodata tool has a few input parameters to keep in mind. The input raster is the most important parameter. This needs to be a raster that has been imported into the project. The maximum distance to interpolate determines how far out WMS will look to fill data. It will use pixel units to do this. The number of 3x3 average filter smoothing iterations to run determines how many smoothing interactions will be run after the interpolation has been calculated. Additional interactions can help in improving the fill data.

Keep in mind that the tool was not intended to create data for large regions of missing data cells, especially regions on the border of the raster. If you have a large area of missing data, it would be best to use other processes to fill in the missing data, such as downloading the missing data and merging it with your raster.

The Fill Nodata tool is one of thetools provided in WMS to let you modify and edit raster data. Try out the Fill Nodata tool in WMS today!

Blog tags: 

Pages